Overview
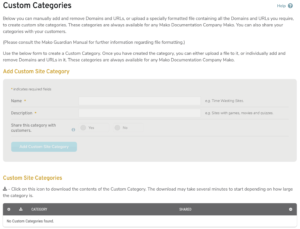
Figure 1. Example Custom Site Categories Page
The Custom Site Categories page (Fig. 1) allows you to manage Custom Site Categories that can be used in Site Category rules on the Mako Guardian Site Categories page.
Custom Site Category rules, like Site Category rules, can be applied to Groups for certain IP addresses, entire LAN segments, certain local users, or all users. See the Groups documentation for details. Similarly, Times function the same for both Custom Site Category rules and Site Category rules.
Custom Site Categories are available to all of your company’s Makos. It does not matter which Mako you are currently configuring.
After creating a category, you can either manually add and remove domains and URLs or upload a specially-formatted definition file containing all of the domains and URLs at once.
Add Custom Site Category
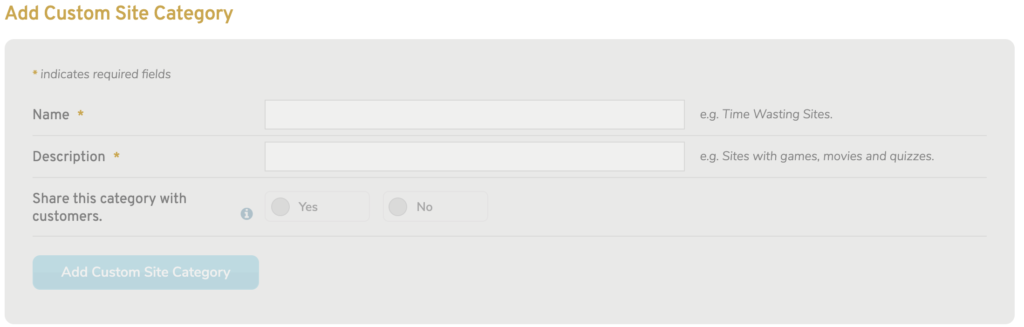
Figure 2. Example Add Custom Site Category Form
Use the Add Custom Site Category (Fig. 2) to create a new Custom Site Category for your company.
Name
Enter an informative, memorable, and unique name for the category.
Description
Enter a description of the websites to be included in the category.
Add Button
To create a new Custom Site Category with these settings, click the “Add” button. You will need to edit the category to specify the websites to include.
View Custom Site Categories

Figure 3. Example Custom Site Categories List
The Custom Site Categories list (Fig. 3) allows you to view and manage existing Custom Site Categories for your company.
Columns
- Category – name of the Custom Site Category
- Options – download, edit, and delete buttons
Actions
Download Custom Site Category Definition File
To download the definition file for a Custom Site Category, click the download arrow icon button in the Options column. The download may take several minutes to get started if the number of sites in the category is large.
Edit Custom Site Category
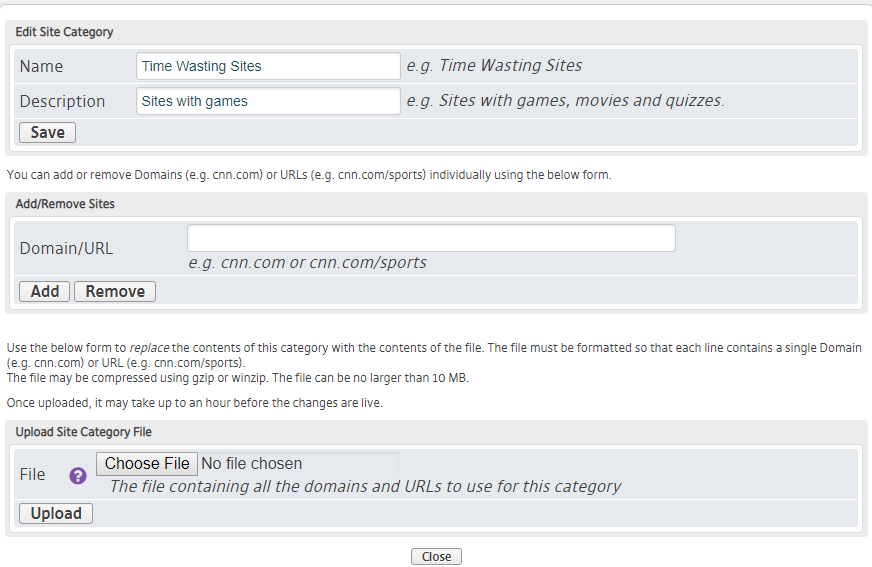
Figure 4. Example Edit Custom Site Category Page
To edit a Custom Site Category, click its gear icon button in the Options column to open the Edit Custom Site Category page (Fig. 4) in a new window.
Edit Custom Site Category Details
Use the Edit Site Category form to edit the Name and Description of the Custom Site Category.
Make any desired changes, then click the “Save” button.
Manage Custom Site Category Sites
Use the Add/Remove Sites form to specify each individual domain and/or URL to include in the Custom Site Category.
Enter a Domain/URL value, then click either the “Add” button to add it to the category or the “Remove” button to remove it from the category. Repeat as needed.
Upload Custom Site Category Definition File
Use the Upload Site Category File form to specify all domains and/or URLs to include in the Custom Site Category at once by uploading a definition file.
Uploading a definition file will completely REPLACE any previous domains and/or URLs you have specified for the Custom Site Category.
The definition file must be formatted so that each line contains a single domain (e.g. cnn.com) or URL (e.g. cnn.com/sports). If any line of the file contains an invalid domain or URL, then the entire file is ignored.
The definition file must be no larger than 10 MB. It can be compressed using software such as gzip or WinZip, if needed.
Once you have created a definition file, click the “Choose File” button to locate it on your device. Then click the “Upload” button to import the definition file.
You can check the progress of the update by returning to the Edit Custom Site Category page and viewing the Update Status list at the bottom of the page.
It may take up to an hour after the definition file has been uploaded before the changes take effect.
Delete Custom Site Category
To delete a Custom Site Category, click its “X” icon button in the Options column.