This topic is ONLY relevant to security gateways. It is NOT relevant to managed switches.

Figure 1. Example Summary Page
The Summary page (Fig. 1) displays details for each Internet connection of the selected Mako and provides a place to manage the availability and priority of each connection.
Columns
- Edit – icon button for managing the connection
- Move – icon button for changing the priority of the connection
- Enabled – icon buttons for managing the availability of the connection
- WAN – connection name and a link for managing the connection
- Status – shows the connection is online, offline, and/or having issues
- In Use – whether or not the Mako is currently using the connection as the default gateway to the Internet
- Uptime – how long the connection has been up
- IP Address – IP address of the Mako on the connection
- Link – interface link detail
- Download – download usage of the connection
- Upload – upload usage of the connection
- Priority – order the Mako will use the connection as compared to other connections
Actions
Raise Connection Priority
Click the up arrow icon button to raise the connection one position on the priority list.
If the first priority connection is unavailable, the Mako will switch to the next connection in the priority list, and so on, until it reaches an available connection.
Manage Connection Details
Click the gear icon button to visit the appropriate WAN or Cell page for managing the connection.
Enable/Disable Connection
Use the toggle button to enable or disable the connection. When the toggle is in the left position and dimmed, the connection is disabled. When the toggle is in the right position and highlighted, the connection is enabled,
Allocate WAN
Certain Mako models allow you to convert the last LAN port into an additional WAN port, if desired.
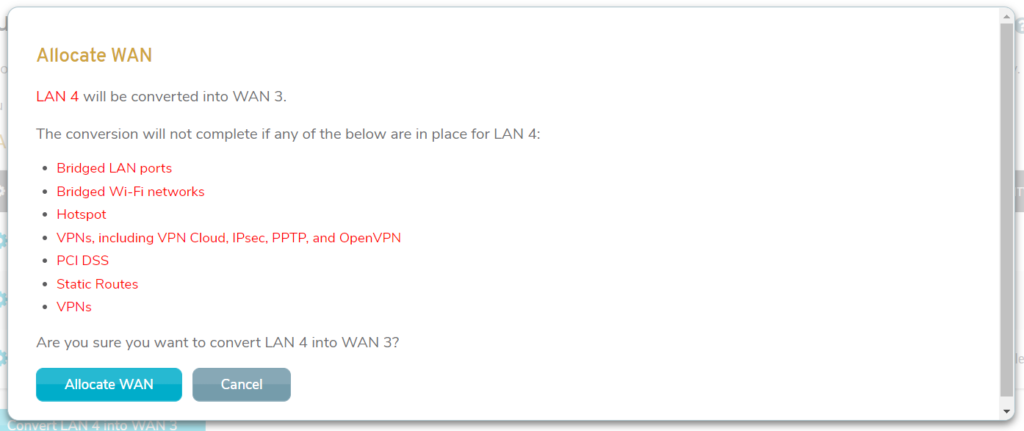
Figure 2. Allocate WAN Confirmation
Click the “Convert LAN [X] into WAN [Y]” button (“Convert LAN 4 into WAN 3” in Fig. 1) to open the Allocate WAN Confirmation (Fig. 2).
Note that the conversion cannot be completed if any of the following are configured for the specified LAN:
- Bridged LAN ports
- Bridged Wi-Fi networks
- Hotspot
- VPNs, including VPN Cloud, IPsec, PPTP, and OpenVPN
- PCI DSS
- Static Routes
Click the “Allocate WAN” button (Fig. 2) if you are certain that you want to continue. The new WAN will now appear in the left navigation and on the Summary page.
This conversion can be reversed. See the WANs documentation for details.