This topic is ONLY relevant to security gateways. It is NOT relevant to managed switches.
Overview
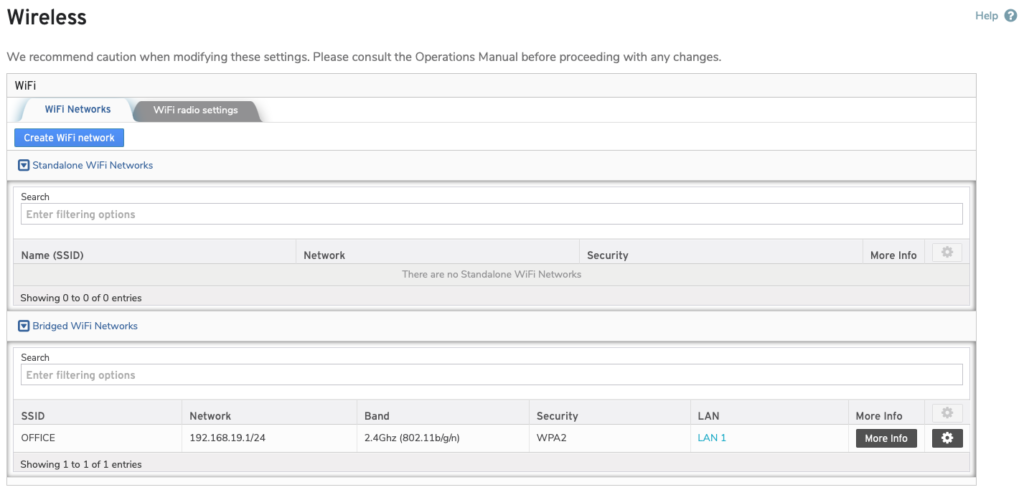
Figure 1. Wireless Page
The Wireless page (Fig. 1) is where you can manage standalone and bridged WiFi networks and also configure settings for the WiFi radio that will apply to all of the selected Mako’s WiFi networks.
WiFi Networks
The WiFi Networks tab (Fig. 1) allows you to view, create, edit, and delete WiFi networks and gives you the ability to customize how they operate.
Create WiFi Network
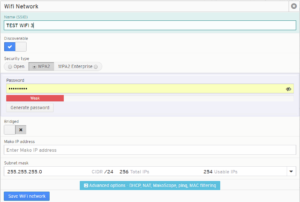
Figure 2. Create WiFi Network Form
Click the “Create WiFi network” button (Fig. 1) to open the Create WiFi Network form (Fig. 2).
Name (SSID)
Enter a name for the network, also known as a service set identifier (SSID), so that you can easily identify the network. It should be informative, memorable, and unique. Only alphanumeric characters, spaces, underscores, and hyphens are allowed.
Discoverable
Choose whether or not your network will be discoverable. By default, this IS checked, which allows your WiFi network’s SSID to be seen by anyone looking for nearby WiFi networks. If this IS NOT checked, users must search for the exact SSID of your WiFi network.
Security Type
Choose from among three Security Type options: Open, WPA2, and WPA2 Enterprise. WPA2 and WPA2 Enterprise each have their own additional associated settings.
Open
This leaves the WiFi network vulnerable as no password is set to help block unauthorized access. It is highly recommended that you not leave any of your networks open without a password.
WPA2
This makes your WiFi network more secure as it requires you to set a password and requires your users to enter that password to access the network.
Password
Enter a password that is difficult to guess. An indicator will display the strength of your password based on factors such as length and character diversity. Click the “Generate password” button if you want to use a randomly generated password for maximum security. It is good practice to change passwords on a regular basis.
WPA2 Enterprise
This is the enterprise version of WPA2, which is more secure but also more complex to implement. It uses Remote Authentication Dial-In User Service (RADIUS) servers to authenticate clients.
RADIUS Authentication Server IP
Enter the IP address of the RADIUS authentication server.
RADIUS Authentication Server Port
Enter the server port number of the RADIUS authentication server.
RADIUS Authentication Server Secret
Enter the shared secret value of the RADIUS authentication server.
RADIUS Accounting Server IP
Enter the IP address of the RADIUS accounting server.
RADIUS Accounting Server Port
Enter the server port number of the RADIUS accounting server.
RADIUS Accounting Server Secret
Enter the shared secret value of the RADIUS accounting server.
Bridged
Choose whether or not the WiFi network should be “Bridged,” as opposed to “Standalone.” This IS NOT checked by default, i.e. “Standalone.” Either choice has additional associated fields.
Standalone
A standalone WiFi network is not connected to any of the Mako’s LANs. An example of this is a guest WiFi network for your customers that only provides access to the Internet.
Mako IP address
Enter the internal IP address to be used by the Mako.
Subnet Mask
Choose the subnet mask for the internal IP address. This restricts the range of IP addresses available to a network. Many networks use a subnet mask of “255.255.255.0” to require the first three groups of digits to be identical for all IP addresses in the network, i.e. only the fourth set of digits varies.
Bridged
A bridged WiFi network is connected to one of the Mako’s LANs and is able to access the same content and hardware as a regular LAN client. An example of this is an employee WiFi network that provides access to the Internet and also access to printers on the associated LAN.
Local Network
Choose the LAN to bridge with this WiFi network.
Advanced Options
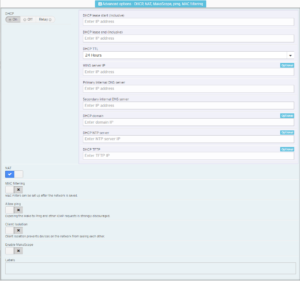
Figure 3. Create WiFi Network Form’s Advanced Options
Click the “Advanced options” button to reveal the Advanced Options settings (Fig. 3).
DHCP
Dynamic Host Configuration Protocol (DHCP) lets you centrally manage and automate the assignment of IP addresses on your network. The default value for DHCP is “On.”
If DHCP is set to “Off,” DHCP service will not be enabled for the WiFi network.
If DHCP is set to “On,” the following fields will be available:
DHCP Lease Start IP & DHCP Lease End IP
Enter the first and last IP addresses (Start IP and End IP, respectively) that define an inclusive range of IP addresses available for the WiFi network’s DHCP leases.
DHCP [Lease] TTL
Use the DHCP [Lease] TTL (Time to Live) dropdown to choose the length of time before a DHCP lease issued to a client expires. When the client is assigned a new lease, it may be for a different IP address than the expired lease.
WINS Server IP (Optional)
If relevant for your network, enter the IP address of a WINS server, which is a Microsoft service that translates hostnames into IP addresses.
Primary Internal DNS Server
A Domain Name System (DNS) server is used to map domain names to IP addresses. Enter a primary DNS server in your network to handle your DNS queries.
Secondary Internal DNS Server
Enter a secondary DNS server in your network to handle your DNS queries in the event the primary DNS server is unavailable.
DHCP Domain (Optional)
Enter the IP address of the Domain service of the DHCP server.
DHCP NTP Server (Optional)
Enter the IP address of the NTP Server service of the DHCP server.
DHCP TFTP (Optional)
Enter the IP address of the TFTP service of the DHCP server.
If DHCP is set to “Relay,” the following fields will be available:
DHCP Primary Relay Server
Enter a primary DHCP server external to the network that handles DHCP for the network.
DHCP Secondary Relay Server
Enter a secondary DHCP server external to the network that will handle DHCP for the network in the event the primary DHCP server is unavailable.
NAT
Network Address Translation (NAT) allows you to place public IP addresses supplied by your Internet Service Provider (ISP) directly on the network. The default value is “On.” Disabling NAT means IP traffic from devices attached to the network will not be modified by the Mako, and firewall rules will still need to be created to access these devices. Disabling NAT should only be done when using publicly routable IP addresses.
MAC Filtering
The MAC Filtering setting is disabled by default. When enabled, it restricts network access to only known devices, i.e. a device must be registered in the system in order to use the network. To register devices, see the DHCP Leases documentation (even if the WiFi network does not use DHCP).
Allow Ping
The Allow Ping setting is set to “Deny” by default. If set to “Allow,” it will allow the WiFi network to respond to ping requests. It is recommended to leave this disabled for security reasons.
Client Isolation
The Client Isolation setting is disabled by default. If enabled, this prevents devices on the network from seeing each other.
Enable MakoScope
The Enable MakoScope setting is disabled by default. If enabled, this feature displays basic diagnostic and operating information for your Mako when you type its WiFi network IP address into a web browser. This information is only viewable if the web browsing device is also connected to the WiFi network.
Labels
The Labels field allows you to manage label values assigned to the network. A label can be added by typing a label value in the field and then pressing the Space bar on your keyboard. A label can be removed by clicking the “X” next to the label.
Labels provide a way to apply firewall templates to networks. See the Firewall documentation for more details.
Save WiFi Network Button
To create your new WiFi network with these settings, click the “Save WiFi network” button.
View WiFi Networks
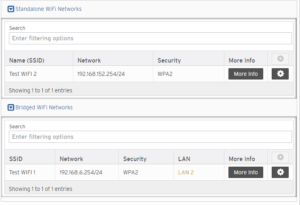
Figure 4. Standalone WiFi Networks List & Bridged WiFi Networks List
WiFi networks created for the selected Mako will appear in either the Standalone WiFi Networks list or the Bridged WiFi Networks list (Fig. 4). These two lists function in the same manner; the only difference is the type of network included in each list.
Show/Hide
Click the title of the list to show or hide the list.
Search
Enter search terms in the Search field above the list to search for a WiFi network based on its Name/SSID, IP address, or security type. The list will be filtered as you type.
Columns
- Name (SSID) – identifier of the network
- Network – IP address and subnet mask of the network
- Security – security type of the network
- LAN (bridged only) – the LAN with which this network is bridged
- More Info – “More Info” button that opens a details panel for this network
- [Options] – gear icon button that opens an options panel for this network
Edit WiFi Network
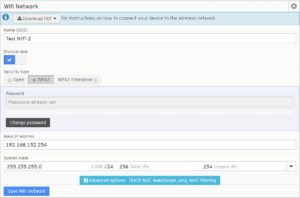
Figure 5. Edit WiFi Network Form
To edit a WiFi network, first click its gear icon button in the Options column (Fig. 4). Then click the “Edit” button to open the Edit WiFi Network form (Fig. 5). This form is almost identical to the Create WiFi Network form (Figs. 2, 3).
Here you can make any desired changes.
To save your changes, click the “Save WiFi Network” button.
Delete WiFi Network
To delete a WiFi network, first click its gear icon button in the Options column (Fig. 4). Then click the “Remove” button to open a confirmation panel asking you to confirm the deletion. If you are certain you want to delete the WiFi network, click the “OK” button.
WiFi Radio Settings
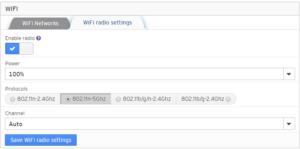
Figure 6. WiFi Radio Settings Tab
The WiFi Radio Settings tab (Fig. 6) allows you to configure settings for the WiFi radio that will apply to all of the selected Mako’s WiFi networks.
Enable Radio
The WiFi radio is enabled by default. If disabled, the Mako will not broadcast any WiFi signals, which will disable all of its WiFi networks.
Power
The Mako’s WiFi signal strength is set to 100% by default. You can choose options from 10% to 100% using the Power dropdown.
Protocols
Specify the wireless protocols that you would like to use for your WiFi networks.
- 802.11n-2.4Ghz
- 802.11n-5Ghz (default)
- 802.11b/g/n-2.4Ghz
- 802.11b/g-2.4Ghz
Choose the option that works best for your needs. For example, 5 Ghz provides better throughput, faster data speeds, and more frequencies than 2.4 Ghz, but 2.4 Ghz has better signal range.
Channel
By default, Channel is set to “Auto,” but you can choose a specific WiFi channel to use for your WiFi networks. The channels available depend on whether you are using 2.4 Ghz or 5 Ghz protocols. It is recommended that you leave Channel set to “Auto” so the Mako will automatically switch to the best channel available.
Save WiFi Radio Settings Button
To save your changes, click the “Save WiFi radio settings” button.