This topic is ONLY relevant to security gateways. It is NOT relevant to managed switches.
Overview
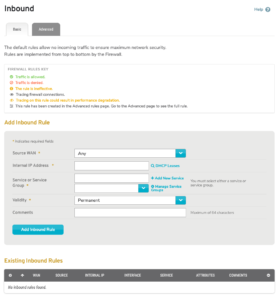
Figure 1. Example Inbound Rules Page
The Inbound Rules page (Fig. 1) allows you to manage firewall rules for the selected Mako that affect traffic inbound from each wide area network (WAN). You can create both basic and advanced inbound firewall rules.
If no custom rules have been created, the default rules will be used. The default rules do not allow any inbound traffic to enter your network, ensuring maximum network security.
Firewall rules are implemented from top to bottom as they appear on this page.
Basic Settings
Use the Basic Settings tab (Fig. 1) to manage basic inbound firewall rules. If you need more control over the handling of inbound traffic than is provided here, you can use the Advanced Settings tab instead.
Add Inbound Rule
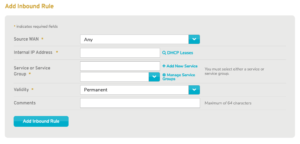
Figure 2. Add Inbound Rule Form
Use the Add Inbound Rule form (Fig. 2) to add a new inbound firewall rule.
Source WAN
Choose the WAN that is the source of the inbound traffic to which the new rule will apply, or choose “Any” if you want the new rule to apply to inbound traffic from all WANs.
Internal IP Address
Enter the internal IP address and network mask (in CIDR notation) to which the new rule will apply. This can be a single device or an entire LAN.
As a convenience, you can click the “DHCP Leases” button to open a new window containing a list of devices registered on your network, then click the desired device to populate Internal IP Address with the IP address of the device.
Service or Service Group
If you want this rule to match traffic by service, use the service type selector or the service group dropdown to specify the service type values that match the desired traffic.
Leave both fields blank to allow traffic for all services.
Service Type Selector
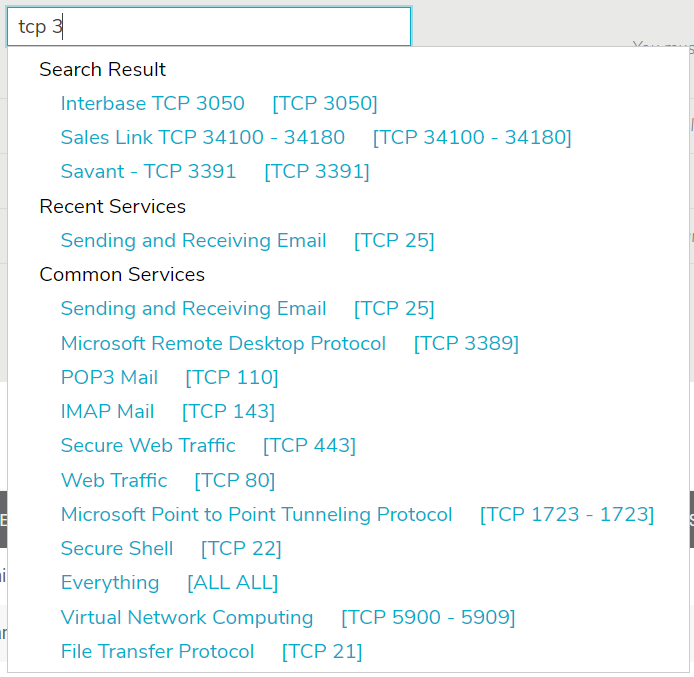
Figure 3. Example Service Type Selector
Use the service type selector (Fig. 3) to specify the service type of the traffic to which the new rule will apply. The service type selector will display a Search Results list as you type. Below the Search Results list, you will see lists of Recent Services (if any have been selected recently) and Common Services. If the desired service type is visible in one of these lists, click the service type to select it. Otherwise, click the “Add new service” link below the selector to open the Add Service page (Fig. 4) in a new window.
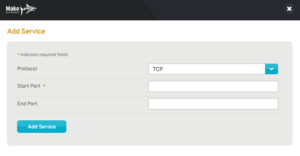
Figure 4. Example Add Service Page
Use the Add Service form (Fig. 4) to add a new service type to the selector by choosing a Protocol (either “TCP” or “UDP”), entering Start Port and End Port values, and then clicking the “Add Service” button.
SERVICE GROUP
To match a predetermined group of services, choose a Service Group from the dropdown field and leave the service type selector blank. To create a Service Group, click the “Manage Service Groups” link to visit the appropriate CMS page. This link takes you away from the current page, so you will lose any unsaved values in this form.
Validity
Choose how long the new rule will be valid. The default value is “Permanent,” or you can specify a duration from “6 hours” to “4 weeks.”
Comments
Enter any additional comments you may have regarding this rule. These comments are restricted to a maximum of 64 characters.
Add Button
To create the new inbound firewall rule, click the “Add Inbound Rule” button.
Existing Inbound Rules

Figure 5. Example Existing Inbound Rules List
The Existing Inbound Rules list (Fig. 5) is where you can manage existing inbound firewall rules.
- [Edit] – edit button
- [Raise Priority] – raise priority button
- WAN – source WAN to which the rule applies
- Source – external IP address to which the rule applies
- Internal IP – internal IP address to which the rule applies
- Interface – LAN to which the rule applies
- Service – service type to which the rule applies
- Attributes – attribute icons; see Firewall Rules Key for details
- Comments – comments describing the rule
- [Delete] – delete button
Edit Inbound Rule
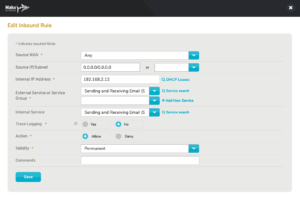
Figure 6. Example Edit Inbound Rule Form
To edit a firewall rule, click its gear icon button in the Edit column. This will open the Edit Inbound Rule form (Fig. 6) in a new window.
See the advanced Add Inbound Rule form below for descriptions of the Action and Trace Logging fields.
Make any desired changes, then click the “Save” button.
Raise Inbound Rule Priority
To raise an inbound firewall rule one position in the list, click its up arrow icon button in the Raise Priority column.
Firewall rules are implemented from top to bottom of the list. A good strategy for creating rules here is to create a “deny all traffic” rule first, and then add any exceptions to this rule as rules positioned below it.
Delete Inbound Rules
To delete an inbound firewall rule, click its minus icon button in the Delete column. This will open a confirmation panel asking you to confirm the deletion. If you are certain you want to delete the inbound firewall rule, click the “OK” button.
To delete ALL existing inbound firewall rules at the same time, click the “Delete All Inbound Rules” button at the bottom of the Existing Inbound Rules list. This will open a confirmation panel asking you to confirm the deletions. If you are certain you want to delete ALL existing inbound firewall rules, click the “OK” button. This will delete BOTH basic and advanced inbound firewall rules.
Advanced Settings
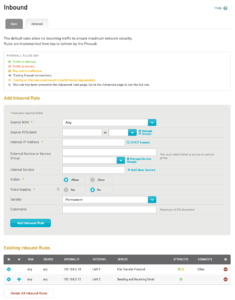
Figure 7. Example Advanced Settings Tab
Use the Advanced Settings tab (Fig. 7) to manage advanced inbound firewall rules.
Add Inbound Rule
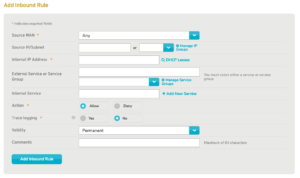
Figure 8. Advanced Add Inbound Rule Form
Use the advanced Add Inbound Rule form (Fig. 8) to add a new advanced inbound firewall rule.
Source WAN
Choose the WAN that is the source of the inbound traffic to which the new rule will apply, or choose “Any” if you want the new rule to apply to inbound traffic from all WANs.
Source IP/Subnet
If you need to be more specific than choosing an entire source WAN, enter the external IP address or subnet mask in the text field for the source of the inbound traffic to which the new rule will apply.
To match a predetermined group of IP addresses, choose an IP Group from the dropdown field and leave the text field blank. To create an IP Group, click the “Manage IP Groups” link to visit the appropriate CMS page. This link takes you away from the current page, so you will lose any unsaved values in this form.
Leave both fields blank to match traffic from all sources.
Internal IP Address
Enter the internal IP address and network mask (in CIDR notation) to which the new rule will apply. This can be a single device or an entire LAN.
As a convenience, you can click the “DHCP Leases” button to open a new window containing a list of devices registered on your network, then click the desired device to populate Internal IP Address with the IP address of the device.
External Service or Service Group
Use the service type selector to specify the external service type of the inbound traffic to which the new rule will apply. The service type selector will filter its results as you type.
See the Service or Service Group field in the basic Add Inbound Rule form for a full description of how to use the service type selector and service groups dropdown.
Internal Service
Use the service type selector to specify the internal service type for inbound traffic if it should differ from the external service type. They are the same by default. Choose compatible internal and external service types. Traffic that cannot be converted will be lost.
An example of when you might change this is to forward inbound traffic from one port to two different internal IP addresses. For instance, to allow inbound TCP 443 traffic to two servers, create two inbound firewall rules: one for external port TCP 4443 to forward traffic to internal port TCP 443 on the first server, and one for external port TCP 4444 to forward traffic to internal port TCP 443 on the second server.
See the Service or Service Group field in the basic Add Inbound Rule form for a full description of how to use the service type selector and service groups dropdown.
Action
Choose whether to allow or deny the traffic to which the new rule will apply. This is set to “Allow” by default. Click the “Deny” radio button to deny the traffic instead.
Trace Logging
Trace logging allows you to trace individual IP connections allowed and denied through the firewall. The trace information can be viewed on the Reports >> Syslogs page by selecting the “Firewall Logs” type. Trace logging is disabled by default. To enable it, click the “Enable trace logging” checkbox. Trace logging can negatively impact performance and should only be enabled while troubleshooting firewall-related connection problems. Trace logging is disabled automatically after four days.
Validity
Choose how long the new rule will be valid. The default value is “Permanent,” or you can specify a duration from “6 hours” to “4 weeks.”
Comments
Enter any additional comments you may have regarding this rule. These comments are restricted to a maximum of 64 characters.
Add Button
To create the new inbound firewall rule, click the “Add Inbound Rule” button.
Existing Inbound Rules

Figure 9. Example Advanced Existing Inbound Rules List
The advanced Existing Inbound Rules list (Fig. 9) is where you can manage existing advanced inbound firewall rules.
- [Edit] – edit button
- [Raise Priority] – raise priority button
- WAN – source WAN to which the rule applies
- Source – external IP address to which the rule applies
- Internal IP – internal IP address to which the rule applies
- Interface – LAN to which the rule applies
- Service – external and internal service types to which the rule applies
- Attributes – attribute icons; see Firewall Rules Key for details
- Comments – comments describing the rule
- [Delete] – delete button
Edit Inbound Rule
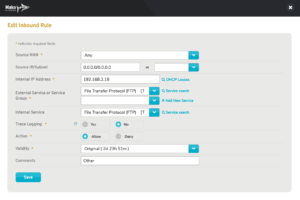
Figure 10. Example Advanced Edit Inbound Rule Form
To edit an advanced firewall rule, click its gear icon button in the Edit column. This will open the advanced Edit Inbound Rule form (Fig. 10) in a new window.
Make any desired changes, then click the “Save” button.
Raise Inbound Rule Priority
To raise an inbound firewall rule one position in the list, click its up arrow icon button in the Raise Priority column.
Firewall rules are implemented from top to bottom of the list. A good strategy for creating rules here is to create a “deny all traffic” rule first, and then add any exceptions to this rule as rules positioned below it.
Delete Inbound Rules
To delete an inbound firewall rule, click its minus icon button in the Options column. This will open a confirmation panel asking you to confirm the deletion. If you are certain you want to delete the inbound firewall rule, click the “OK” button.
To delete ALL existing inbound firewall rules at the same time, click the “Delete All Inbound Rules” button at the bottom of the Existing Inbound Rules list. This will open a confirmation panel asking you to confirm the deletions. If you are certain you want to delete ALL existing inbound firewall rules, click the “OK” button. This will delete BOTH basic and advanced inbound firewall rules.
