This topic is ONLY relevant to security gateways. It is NOT relevant to managed switches.
Overview
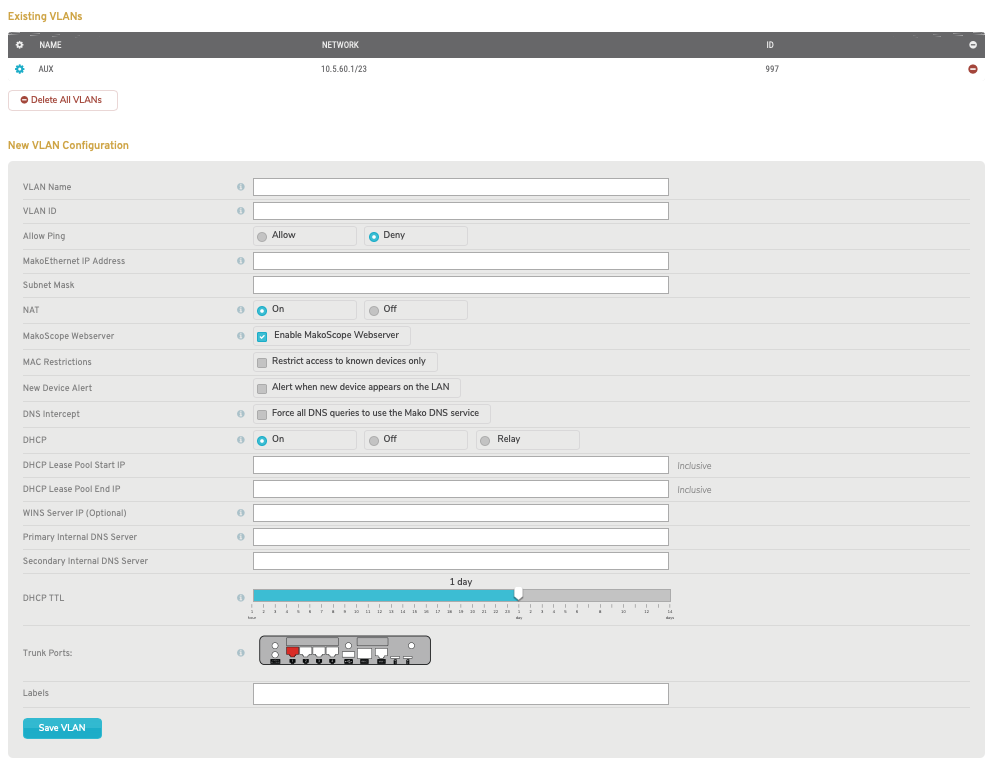
Figure 1. Example VLAN Setup Page
The Virtual LAN (VLAN) Setup page (Fig. 1) allows you to create VLANs to subdivide your network further by creating multiple separate networks on one LAN. This can improve security and reduce data collisions.
VLAN Trunk Messages
![]()
Figure 2. VLAN Trunk Not Found Message
A VLAN Trunk handles traffic for all VLANs on the selected Mako. VLAN Setup will not be available until a VLAN Trunk has been established; instead, you will see a VLAN Trunk Not Found message (Fig. 2). To designate one of your LANs as the VLAN Trunk, see the LAN documentation.
![]()
Figure 3. Example VLAN Trunk Found Message
If a LAN has been designated as the VLAN Trunk, it will be identified in the VLAN Trunk Found message (Fig. 3), and VLAN Setup will be available.
Existing VLANs

Figure 4. Example Existing VLANs List
The Existing VLANs list (Fig. 4) allows you to view details for your existing VLANs and to edit or delete existing VLANs.
- [Edit] – edit button
- Name – informative, memorable, and unique name for the VLAN
- Network – IP address and subnet mask for the VLAN
- ID – unique VLAN ID used to label data originating from the VLAN
- [Delete] – delete button
Edit VLAN Configuration
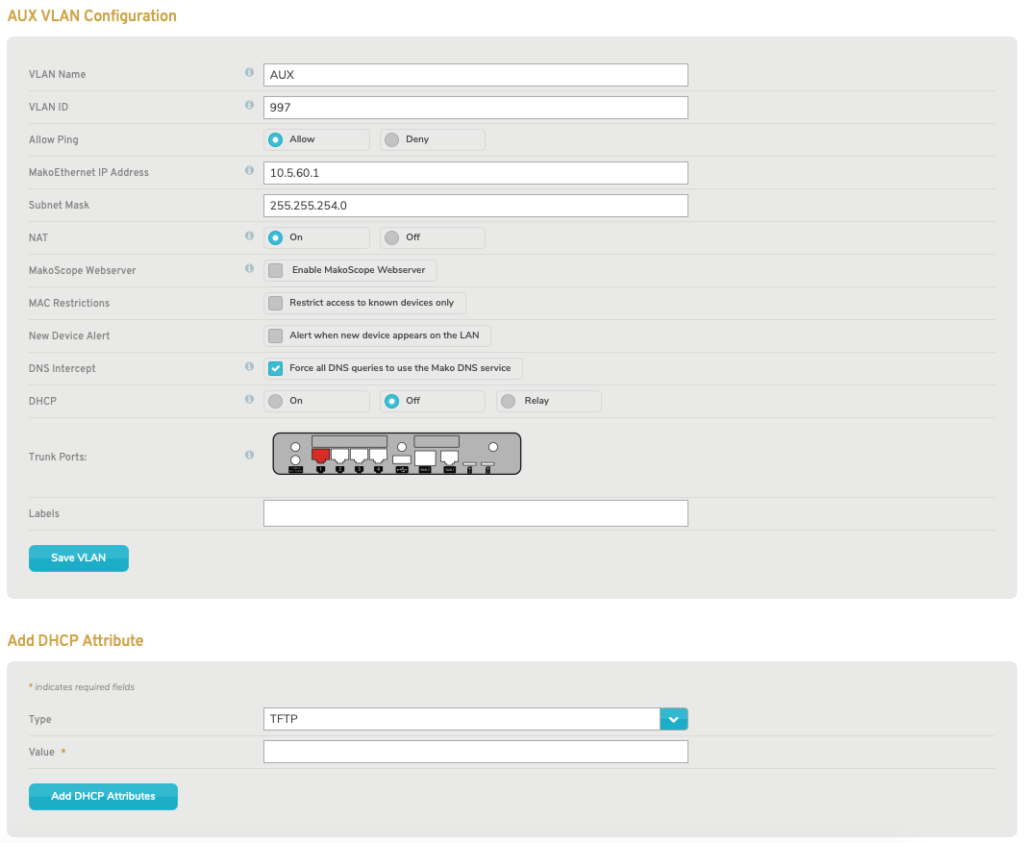
Figure 5. Example Edit VLAN Configuration Page
To edit a VLAN, click its gear icon button (Fig. 4). This will open the Edit VLAN Configuration page (Fig. 5) in a new window.
Make any desired changes, then click the “Save VLAN” button.
DHCP Attributes
If DHCP is set to “On,” you are able to manage additional settings using the DHCP Attributes form (Fig. 5). This allows you to decide how you want various types of services to run by assigning them values that correspond to different actions and operations.
Add DHCP Attribute
To add a DHCP Attribute, choose an option for Type, enter an appropriate Value, and then click the “Add DHCP Attribute” button.
The Type dropdown initially contains the following services: TFTP, DOMAIN, and NTP Server.
The Value should correspond to the action or operation that you want the service to do.
After you add an attribute for a specific type, that type will no longer appear in the dropdown; it will appear in the list above the form instead. There it can be edited or deleted.
Edit DHCP Attribute
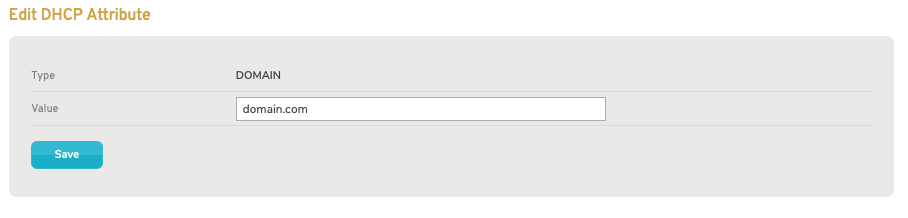
Figure 6. Example Edit DHCP Attribute Page
To edit a DHCP Attribute, click its gear icon button. This will open the Edit DHCP Attribute Page (Fig. 6) in a new window.
In the new window, you are able to change the Type and Value of the DHCP Attribute.
To save your changes, click the “Save” button. Then click the “X” icon in header to close the new window, which will also refresh the attribute list to reflect your changes.
Delete DHCP Attribute
To delete a DHCP Attribute, click its minus icon button. This will delete the attribute from the list. The service for the deleted attribute will be available in the Type dropdown again.
Delete VLAN Configuration
To delete a VLAN configuration, click its minus icon button (Fig. 4). This will open a confirmation panel asking you to confirm the deletion. If you are certain you want to delete the VLAN, click the “OK” button.
To delete ALL existing VLAN configurations at the same time, click the “Delete All VLANs” button below the table (Fig. 4). This will open a confirmation panel asking you to confirm the deletion. If you are certain you want to delete ALL VLANs, click the “OK” button.
New VLAN Configuration
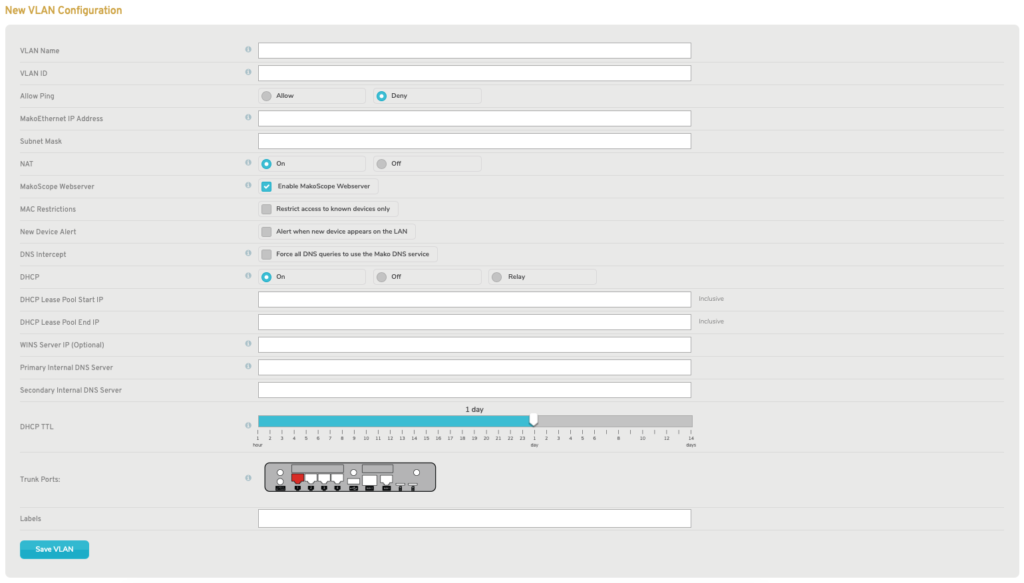
Figure 7. Example New VLAN Configuration Form
To add a VLAN configuration, use the New VLAN Configuration form (Fig. 7).
VLAN Name
Enter a name for the VLAN that is informative, memorable, and unique.
VLAN ID
Enter an ID number for VLAN ID. Data originating from this VLAN is tagged with its VLAN ID. All routers and switches that are part of the VLAN must be configured to use the same VLAN ID.
Allow Ping
The Allow Ping setting is set to “Deny” by default. If set to “Allow,” it will allow the VLAN to respond to ping requests.
Mako Ethernet IP Address
Enter the internal IP address to be used by the Mako.
Subnet Mask
Enter the subnet mask for the internal IP address. This restricts the range of IP addresses available to a network. Many networks use a subnet mask of “255.255.255.0” to require the first three groups of digits to be identical for all IP addresses in the network, i.e. only the fourth set of digits varies.
NAT
Network Address Translation (NAT) allows you to place public IP addresses supplied by your Internet Service Provider (ISP) directly onto the VLAN interface. The default value is “On.” Disabling NAT means IP traffic from devices attached to the VLAN will not be modified by the Mako, and firewall rules will still need to be created to access these devices. Disabling NAT should only be done when using publicly routable IP addresses.
MakoScope Webserver
The MakoScope WebServer setting is enabled by default. This feature displays basic diagnostic and operating information for your Mako when you type its VLAN IP address into a web browser. This information is only viewable if the web browsing device is also connected to the VLAN.
MAC Restrictions
The MAC Restrictions setting is disabled by default. When enabled, it restricts VLAN access to only known devices, i.e. a device must be registered in the system in order to use the VLAN. To register devices, see the DHCP Leases documentation (even if the VLAN does not use DHCP).
DHCP
Dynamic Host Configuration Protocol (DHCP) lets you centrally manage and automate the assignment of IP addresses on your network. The default value for DHCP is “On.”
Off
If DHCP is set to “Off,” DHCP service will not be enabled for the VLAN.
On
If DHCP is set to “On,” the following fields will be available:
DHCP Lease Pool Start IP & DHCP Lease Pool End IP
Enter the first and last IP addresses (Start IP and End IP, respectively) that define an inclusive range of IP addresses available for the VLAN’s DHCP leases.
WINS Server IP (Optional)
If relevant for your network, enter the IP address of a WINS server, which is a Microsoft service that translates hostnames into IP addresses.
Primary Internal DNS Server
A Domain Name System (DNS) server is used to map domain names to IP addresses. Enter a primary DNS server in your network to handle your DNS queries.
Secondary Internal DNS Server
Enter a secondary DNS server in your network to handle your DNS queries in the event the primary DNS server is unavailable.
DHCP [Lease] TTL
Use the DHCP [Lease] TTL (Time to Live) slider to set the length of time before a DHCP lease issued to a VLAN client expires. The default duration is 1 day, but this can be set to values ranging from 1 hour to 14 days. Move the slider left to decrease the duration or right to increase the duration. When the VLAN client is assigned a new lease, it may be for a different IP address than the expired lease.
Relay
If DHCP is set to “Relay,” the following fields will be available:
DHCP Primary Relay Server
Enter a primary DHCP server external to the network that handles DHCP for the network.
DHCP Secondary Relay Server
Enter a secondary DHCP server external to the network that will handle DHCP for the network in the event the primary DHCP server is unavailable.
Trunk Ports
This image illustrates which of the Mako’s LAN interfaces (ports) have been designated as the VLAN Trunk. Clicking the image or its label will take you to the appropriate LAN page. See the LAN documentation for more details.
Labels
The Labels field allows you to manage label values assigned to the VLAN. A label can be added by typing a label value in the field and then pressing the Space bar on your keyboard. A label can be removed by clicking the minus icon next to the label.
Labels provide a way to apply firewall templates to VLANs. See the Firewall documentation for more details.
Add New VLAN Button
To create your new VLAN configuration, click the “Add New VLAN” button.
DHCP Attributes
After your VLAN has been added, you can edit it to add DHCP Attributes. See the Edit VLAN Configuration documentation above.