This topic is ONLY relevant to security gateways. It is NOT relevant to managed switches.
Overview
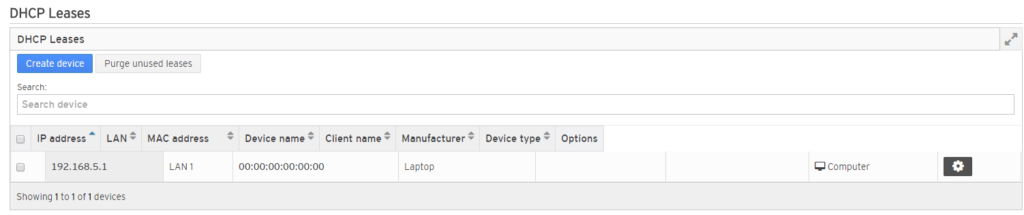
Figure 1. DHCP Leases Page
The DHCP Leases page (Fig. 1) allows you to view and manage DHCP leases for devices on your networks. Here you can see both dynamic and static DHCP leases.
Dynamic leases can be either issued automatically to a device by the Mako or created manually with IP Address set to “Automatic.” The device is assigned the next available IP address on the network whenever it connects. This may or may not be an IP address it has been assigned previously.
Static leases must be created manually and use a static value for IP Address. The device is assigned this static IP address that has been reserved on the network whenever it connects. You must use static leases for devices covered by the PCI template.
Contrary to some of the language used on this page, keep in mind that you are managing “device leases” as opposed to “devices.”
You may see multiple entries for a device that connects to multiple networks, because the device will have at least one lease for each network.
You may also see multiple entries for a device on a single network, because all of the device’s previously assigned leases remain in this list until they are manually purged or deleted or their IP address is reassigned.
Create Device Lease
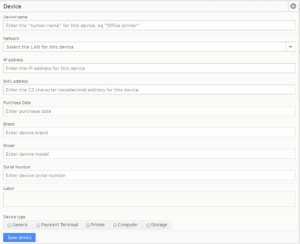
Figure 2. Create Device Form
Click the “Create Device” button (Fig. 1) to open the Create Device form (Fig. 2).
Device Name
Enter a name for the device that is informative, memorable, and unique.
Network
Choose the network to which this device will connect.
IP Address
Enter the internal IP address for the device. This field is set to “Automatic” by default, which allows the device to lease the next available IP address on the network whenever it connects.
MAC Address
Enter the unique MAC address of the device. This may be found on the physical exterior of the device or in its associated software, instructions, or packaging.
Purchase Date
Choose the date you purchased the device or enter it manually in year-month-day format. This is required for devices covered by the PCI template.
Brand
Enter the brand of the device. This is required for devices covered by the PCI template.
Model
Enter the model of the device. This is required for devices covered by the PCI template.
Serial Number
Enter the unique serial number of the device. This may be found on the physical exterior of the device or in its associated software, instructions, or packaging. This is required for devices covered by the PCI template.
Labels
The Labels field allows you to manage label values assigned to the device. A label can be added by typing a label value in the field and then pressing the Space bar on your keyboard. A label can be removed by clicking the minus icon next to the label.
Labels provide a way to apply firewall templates to networks. There are also special labels that alter behavior when applied. See the Firewall documentation for more details.
Device Type
Choose the device type from the following options:
- Generic
- Payment Terminal
- Printer
- Computer
- Storage
Save Device Button
To create the device lease with these settings, click the “Save Device” button.
Purge Unused Device Leases
You are able to purge unused leases, which means any automatically created leases that have not been used recently will be deleted. Manually created leases must be deleted manually and are not included in the purge. Automatically created leases are indicated by the text “Allocated by System” appearing in the Device Name column.
To purge unused leases, click the “Purge Unused Leases” button (Fig. 1). This will open a panel that asks you to confirm the purge. If you are certain that you want to continue, click the “OK” button.
This feature is available in case you want to reduce the number of leases for clarity and ease of use, however you may want to avoid purging leases if you find it valuable to have a history of recent IP address assignments on your networks for troubleshooting purposes.
View Device Leases

Figure 3. Device Leases List
Device leases created for the selected Mako will appear in the Device Leases list (Fig. 3).
Search
Enter search terms in the Search field above the list to search for a device lease based on its IP Address, LAN, MAC Address, Device Name, Client Name, Manufacturer, or Device Type. The list will be filtered as you type.
Columns
- IP Address
- LAN
- MAC Address
- Device Name
If device lease was created automatically, this will contain “Allocated by System.” - Client Name
- Manufacturer
- Device Type
- Options
Clicking a column heading will sort the list using that column’s data, and continuing to click the same column heading will toggle ascending/descending sorting.
Edit Device Lease
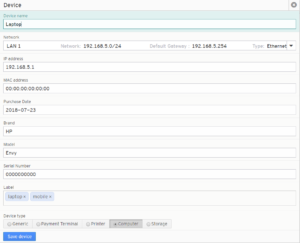
Figure 4. Edit Device Form
To edit a device lease, first click its gear icon button in the Options column (Fig. 3). Then click the “Edit” button to open the Edit Device form (Fig. 4). This form is almost identical to the Create Device form (Fig. 2).
Here you can make any desired changes.
To save your changes, click the “Save Device” button.
Delete Device Lease
To delete a device lease, first click its gear icon button in the Options column (Fig. 3). Then click the “Remove” button to open a confirmation panel asking you to confirm the deletion. If you are certain you want to delete the device lease, click the “OK” button.