This topic is ONLY relevant to security gateways. It is NOT relevant to managed switches.
Overview
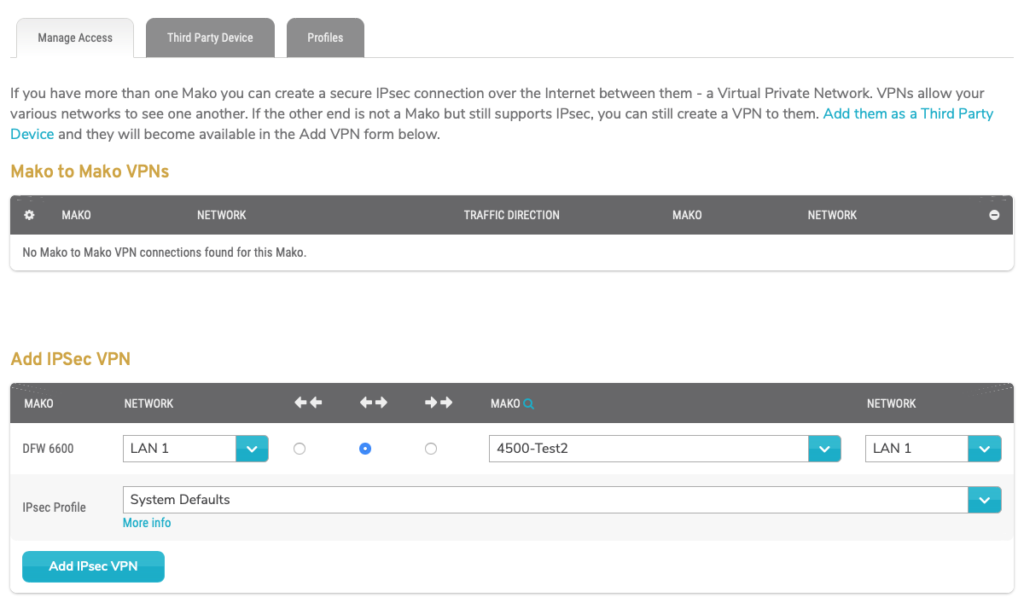
Figure 1. Example IPsec Page
The IPsec page (Fig. 1) allows you to create a Virtual Private Network (VPN) between two peer devices: (1) the selected Mako device and (2) either another Mako device or a third party device that supports Internet Protocol Security (IPsec).
Each VPN configured here is a secure IPsec connection over the Internet that allows the two independent networks to see one another.
If the second peer device is not a Mako but does support IPsec, you must first add it using the Third Party Device tab, then it will become available in the Add VPN form.
Manage Access
Use the Manage Access tab (Fig. 1) to manage Mako to Mako VPNs.
View Mako to Mako VPNs

Figure 2. Example Mako to Mako VPNs List
View Mako to Mako VPNs created for the selected Mako in the Mako to Mako VPNs list (Fig. 2).
- [Edit] – edit button
- [Left] Mako – name of the selected Mako, a.k.a. Left Peer
- [Left Mako] Network – connected network of the selected Mako
- Traffic Direction – data traffic direction allowed between the Makos
(Fine-grained control of this data traffic is available by using the Configure : Firewall : VPN page.) - [Right] Mako – name of the remote Mako, a.k.a. Right Peer
- [Right Mako] Network – connected network of the remote Mako
- [Delete] – delete button
Edit Mako to Mako VPN
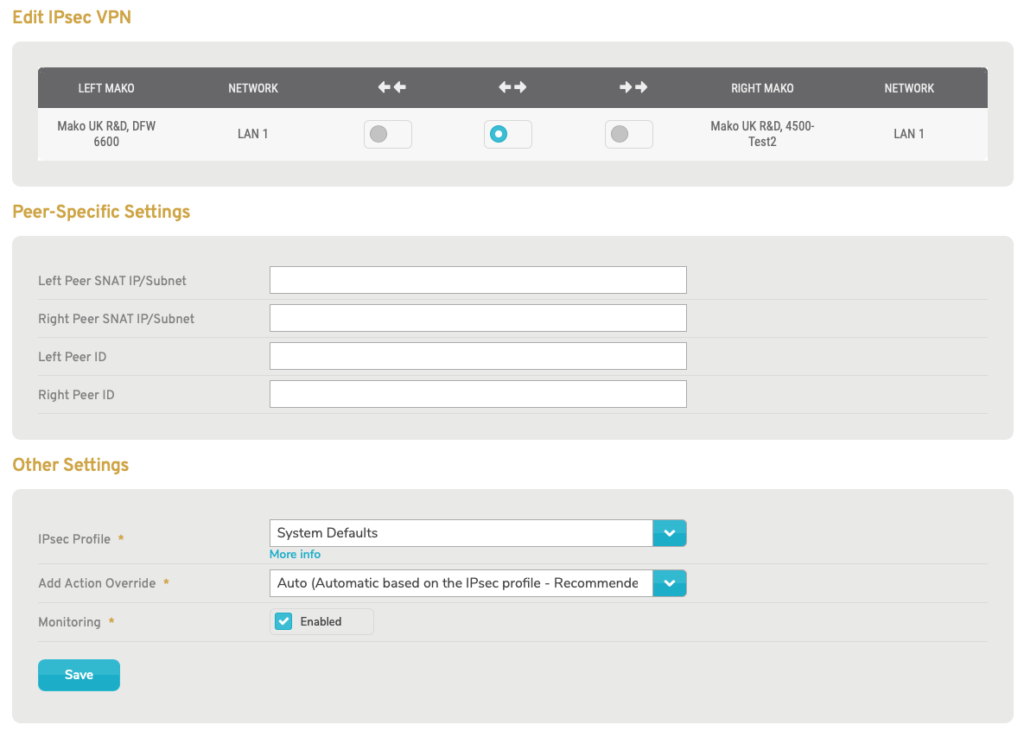
Figure 3. Example Edit Mako to Mako VPN Form
To edit a Mako to Mako VPN, click the gear icon button (Fig. 2). This will open the Edit Mako to Mako VPN form (Fig. 3) in a new window. See the Edit VPN section below for descriptions of each field.
Delete Mako to Mako VPN
To delete a Mako to Mako VPN, click its minus icon button (Fig 2). This will open a confirmation panel asking you to confirm the deletion. If you are certain you want to delete the Mako to Mako VPN, click the “OK” button.
If you do not want to delete the VPN permanently, you can edit it instead and change the Add Action to “Ignore.” This will effectively remove the tunnel but will also preserve its settings, so you can easily reinstate it.
View Mako to Third Party VPNs
[]
Figure 4. Example Third Party VPNs List
View Third Party VPNs created for the selected Mako in the Third Party VPNs list (Fig. 4). This list will only display if you currently have at least one Third Party VPN.
- [Edit] – edit VPN button
- Mako – name of the selected Mako, a.k.a. Left Peer
- [Mako] Network – connected network of the selected Mako
- Traffic Direction – data traffic direction allowed between the selected Mako and the third party device
(Fine-grained control of this data traffic is available by using the Configure : Firewall : VPN page.) - Third Party [Device] – name of the third party device, a.k.a. Right Peer
- [Third Party Device] Network – connected network of the third party device
- [Delete] – delete VPN button
Edit Third Party VPN

Figure 5. Example Edit Third Party VPN Form
To edit a Third Party VPN, click the gear icon button (Fig. 4). This will open the Edit Third Party VPN form (Fig. 5) in a new window. See the Edit VPN section below for descriptions of each field.
Delete Third Party VPN
To delete a Third Party VPN, click its minus icon button (Fig. 4). This will open a confirmation panel asking you to confirm the deletion. If you are certain you want to delete the Third Party VPN, click the “OK” button.
If you do not want to delete the VPN permanently, you can edit it instead and change the Add Action to “Ignore.” This will effectively remove the tunnel but will also preserve its settings, so you can easily reinstate it.
Edit VPN
VPN Settings
[Traffic Direction]
Choose a traffic direction using the radio button under the appropriate arrow icon.
Click the button under the two left-facing arrows (unidirectional to left network) icon to have the Left Peer only receive data and the Right Peer only send data.
Click the button under the one left-facing arrow and one right-facing arrow (bidirectional) icon to have the Left Peer and the Right Peer both sending and receiving data.
Click the button under the two right-facing arrows (unidirectional to right network) icon to have the Left Peer only send data and the Right Peer only receive data.
Fine-grained control of this data traffic is available by using the Configure : Firewall : VPN page.
Peer-specific Settings
Left Peer SNAT IP/Subnet (Optional)
Enter a Source Network Address Translation (Source NAT or SNAT) IP address and subnet for the Left Peer.
Right Peer SNAT IP/Subnet (Optional)
If the Right Peer is a Mako device, the Right Peer SNAT IP/Subnet field will appear (Fig. 3).
Enter a SNAT IP address and subnet for the Right Peer.
Left Peer ID (Optional)
Enter an informative, memorable, and unique name for the Left Peer (selected Mako).
Right Peer ID (Optional)
Enter an informative, memorable, and unique name for the Right Peer (other Mako or third party device).
Peer IDs should be used when connecting to a third party device and either the Mako or the third party device is behind NAT.
Third Party Device Settings
If the Right Peer is a third party device, the Third Party Device Settings group will appear (Fig. 6).
Name
Enter an informative, memorable, and unique name for the third party device. It may be helpful to reference the location of the device in the name.
Public IP
Enter the public IP address of the third party device.
Private Subnet
Enter the address of the third party device’s network using Classless Inter-Domain Routing (CIDR) notation, which consists of the IP address followed by a slash (“/”) and the number of leading 1 bits in the subnet mask.
Other Settings
Preshared Key
If the Right Peer is a third party device, the Preshared Key field will appear (Fig. 6).
To create the secret PSK, enter a value or click the “random” link to generate a new random value.
Click the “Show Password” button to make the value visible, if you need to visually verify or copy it. It is hidden by default for security purposes.
You will need to enter this secret PSK value on the third party device, as well.
IPsec Profile
Choose a Profile created using the Profiles tab to apply shared settings to this VPN.
Click the “More info” link to view details regarding the selected Profile in a new window.
Add Action Override
Choose how this VPN should behave when an Add action is requested. The following options are available:
- Auto (Automatic based on the IPsec profile – Recommended)
- Add (Other end must initiate the tunnel)
- Start (Mako initiates the tunnel straight away)
- Route (Mako initiates the tunnel only when it sees traffic for it – Not Recommended)
- Ignore (Do not add the tunnel at all)
Only change this if you intend to override the setting from the applied IPsec Profile.
Save Button
To save any changes made in the Edit VPN form, click the “Save” button.
Add VPN

Figure 6. Example Add VPN Form
Use the Add VPN form (Fig. 6) to create an IPsec VPN connection between the selected Mako device and either another Mako device or a registered third party device.
[Left Peer]
The first Mako column illustrates that the selected Mako device is the Left Peer for the VPN.
[Left Peer] Network
Choose the network on the Left Peer that you would like to use for the VPN.
[Traffic Direction]
Choose a traffic direction using the radio button under the appropriate arrow icon.
Click the button under the two left-facing arrows (unidirectional to left network) icon to have the Left Peer only receive data and the Right Peer only send data.
Click the button under the one left-facing arrow and one right-facing arrow (bidirectional) icon to have the Left Peer and the Right Peer both sending and receiving data.
Click the button under the two right-facing arrows (unidirectional to right network) icon to have the Left Peer only send data and the Right Peer only receive data.
[Right Peer]
The second Mako column allows you to choose either another Mako device or a registered third party device as the Right Peer for the VPN.
[Right Peer] Network
Choose the network on the Right Peer that you would like to use for the VPN.
IPsec Profile
Choose a Profile created using the Profiles tab to apply shared settings to this VPN.
Click the “More info” link to view details regarding the selected Profile in a new window.
Source NAT IP/Subnet (Optional)
Enter a SNAT IP address and subnet for the Left Peer.
Preshared Secret
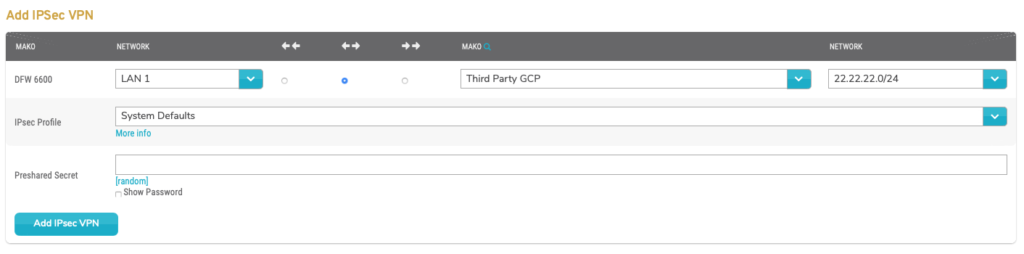
Figure 7. Example Add VPN Form with Third Party Device Selected
If the selected Right Peer is a third party device, the Preshared Secret field will appear (Fig. 7).
To create the secret PSK, enter a value or click the “random” link to generate a new random value.
Click the “Show Password” button to make the value visible, if you need to visually verify or copy it. It is hidden by default for security purposes.
You will need to enter this secret PSK value on the third party device, as well.
Add Button
To create the new VPN, click the “Add IPSec VPN” button.
Third Party Device
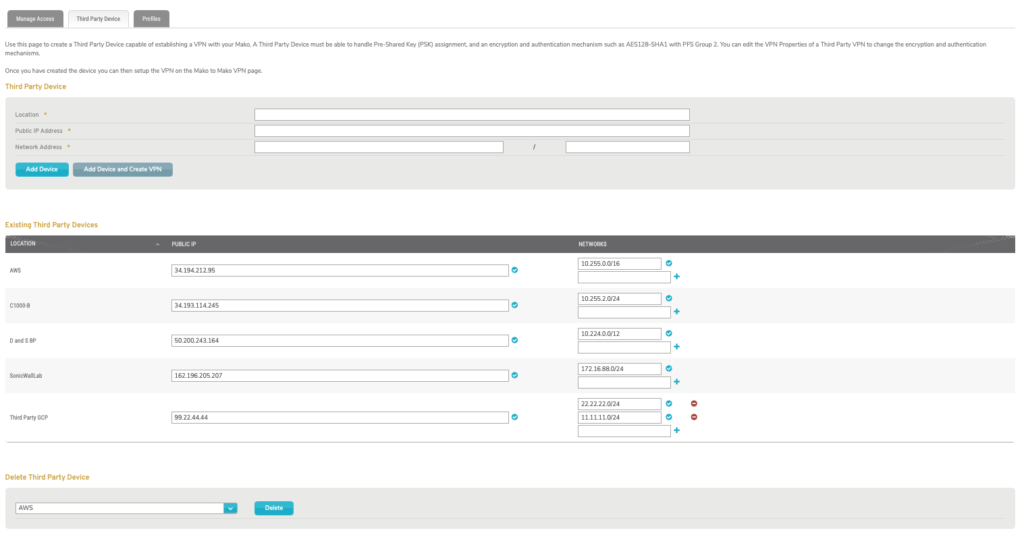
Figure 8. Example Third Party Device Tab
Use the Third Party Device tab (Fig. 8) to manage third party devices. These devices must support IPsec, PSK assignment, and industry-standard encryption and authentication mechanisms, such as “AES128-SHA1 with PFS Group 2.”
Add Third Party Device

Figure 9. Add Third Party Device Form
To add a third party device, use the Add Third Party Device form (Fig. 9).
Location
Enter an informative, memorable, and unique name for the device. It may be helpful to reference the location of the device in the name.
Public IP Address
Enter the public IP address of the device.
Network Address
Enter the address of the device’s network using CIDR notation, which consists of the IP address followed by a slash (“/”) and the number of leading 1 bits in the subnet mask.
Add Device Button
To create the third party device, click the “Add Device” button. You will remain on the Third Party Device tab.
Add Device and Create VPN Button
To create the third party device and return to the Manage Access tab, click the “Add Device and Create VPN” button. This saves you the step of clicking the Manage Access tab, but it DOES NOT automatically create a VPN.
View & Edit Third Party Devices
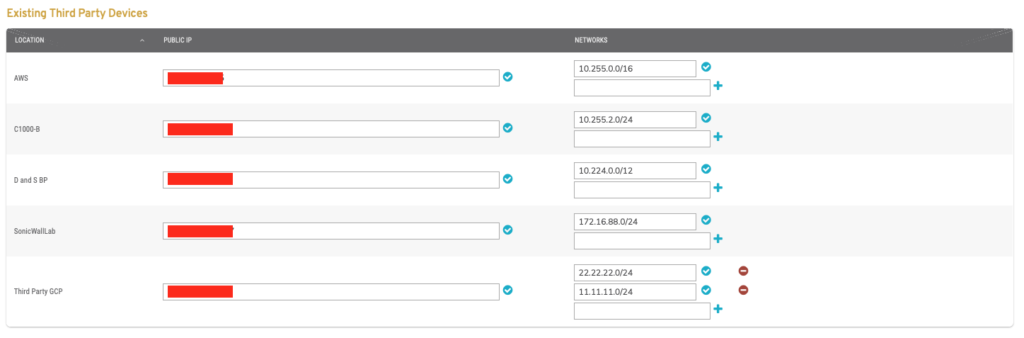
Figure 10. Example Existing Third Party Devices List
To view and edit third party devices, use the Existing Third Party Device list (Fig. 10).
Columns
- Location – name of the device
- Public IP – IP address of the device
- Networks – list of networks on the device, each named using IP address in CIDR notation
Actions
Each device in the list has the following actions available:
- Update Public IP – change the IP address, then click the checkmark icon button to update the value.
- Update Network – change the network IP address (CIDR notation), then click the checkmark icon button to update the value.
- Add Network – enter a network IP address (CIDR notation), then click the plus icon button.
- Delete Network – click the minus icon button.
Delete Third Party Device
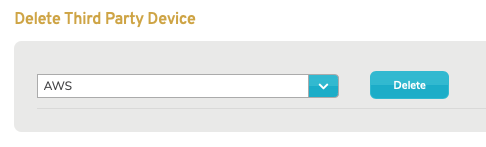
Figure 11. Delete Third Party Device Form
To delete a third party device, use the Delete Third Party Device form (Fig. 11). Choose the third party device to delete and click the “Delete” button. This will open a confirmation panel asking you to confirm the deletion. If you are certain you want to delete the third party device, click the “OK” button.
Profiles
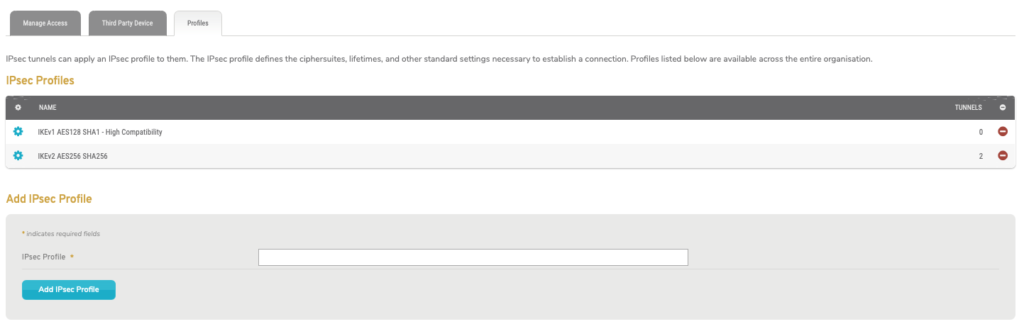
Figure 12. Profiles Tab
Use the Profiles tab (Fig. 12) to manage IPsec Profiles for your company. Profiles allow you to apply settings to multiple IPsec VPN tunnels at once. Each Profile specifies the cipher suites, lifetimes, and other standard settings necessary to establish an IPsec VPN connection. Editing an IPsec Profile will impact all VPN tunnels using that Profile. It is recommended that you use a separate, isolated Profile for testing new settings before applying those settings to an active, shared Profile.
View Profiles
The IPsec Profiles list (Fig. 12) displays the existing IPsec Profiles available for your company.
Columns
- [Edit] – edit button
- Name – name of Profile
- Tunnels – number of IPsec VPN tunnels that currently have this Profile applied
- [Delete] – delete button
Actions
Edit Profile
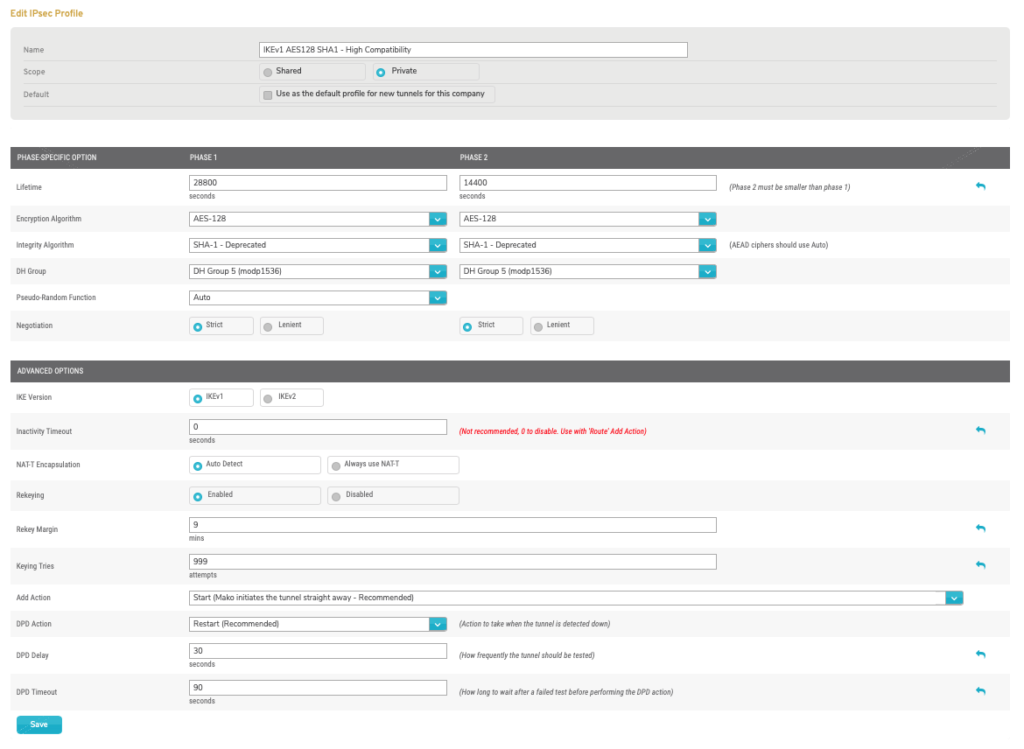
Figure 13. Example Edit IPsec Profile Form
To edit a Profile, click the gear icon button in the Option column. This will open the Edit IPsec Profile form (Fig. 13) in a new window. Some options in the form are only available for specific Mako device models. You may see a compatibility message below the form if there are any issues related to this.
Name
Enter an informative, memorable, and unique name for the Profile.
Scope
Choose whether this Profile is “Private” or “Shared.” Shared Profiles are available to child companies of this company.
Default
Check the checkbox to make this Profile the default Profile for new IPsec VPN tunnels for this company, if desired.
PHASE-SPECIFIC OPTIONS
Internet Key Exchange (IKE) is the protocol used to set up a security association (SA) in the IPsec protocol suite.
The IKE negotiation process has two phases. The settings grouped below can be configured independently for Phase 1 and Phase 2.
Lifetime
Enter the number of seconds you want the IPSec security association to live for both Phase 1 and Phase 2. The Phase 2 value must be smaller than the Phase 1 value.
You can click the “Use defaults” arrow icon in the rightmost column to reset these values to the default values.
Encryption Algorithm
Choose the algorithms to use to encrypt data for both Phase 1 and Phase 2.
Integrity Algorithm
Choose the algorithms to use to authenticate data integrity for both Phase 1 and Phase 2. AEAD ciphers should use the “Auto” option.
DH Group
Choose the Diffie-Hellman (DH) groups to use to determine shared secrets for both Phase 1 and Phase 2.
Pseudo-Random Function
Choose the Pseudo-Random Function (PRF) to use to provide randomness in cryptographic processes.
Negotiation
Choose either the “Strict” or “Lenient” negotiation mode for both Phase 1 and Phase 2. “Strict” negotiation is recommended to maintain compatibility with devices that do not allow “Lenient” negotiation.
ADVANCED OPTIONS
IKE Version
Choose the version of IKE to use. IKEv2 is NOT supported by the following Mako models: 6500, 6500-M, and 8875.
Inactivity Timeout
Enter the number of seconds of inactivity before timeout. It is recommended to use the default value of zero (0) seconds to disable this timeout; however, if you are using “Route” as the Add Action, you may need to change this value.
You can click the “Use defaults” arrow icon in the rightmost column to reset this value to the default value.
NAT-T Encapsulation
NAT Traversal (NAT-T) allows encapsulated traffic to use the VPN to reach the destination when the source does not have a unique public IP address.
Choose either the “Auto Detect” or “Always use NAT-T” option for this feature.
Rekeying
The Rekeying feature automatically initiates rekeying upon expiration of an existing key.
Choose either the “Enabled” or “Disabled” option for this feature.
Rekey Margin
Enter the number of minutes prior to SA expiration when rekeying should begin (if rekeying is enabled).
You can click the “Use defaults” arrow icon in the rightmost column to reset this value to the default value.
Keying Tries
Enter the number of attempts to make when rekeying (if rekeying is enabled).
You can click the “Use defaults” arrow icon in the rightmost column to reset this value to the default value.
Add Action
Choose how to handle Add action requests. The following options are available:
- Add (Other end must initiate the tunnel)
- Start (Mako initiates the tunnel straight away – Recommended)
- Route (Mako initiates the tunnel only when it sees traffic for it – Not Recommended)
- Ignore (Do not add the tunnel at all)
DPD Action
Dead Peer Detection (DPD) is a feature that can determine when a peer device is “dead” or unavailable.
Choose the action to take when the tunnel is detected down. The following options are available:
- None
- Clear (Stop and unroute all connections with dead peer)
- Hold (Put all connections with dead peer in a “suspended state”)
- Restart (Restart all connections with dead peer – Recommended)
DPD Delay
Enter the number of seconds to wait between each DPD keepalive check.
You can click the “Use defaults” arrow icon in the rightmost column to reset this value to the default value.
DPD Timeout
Enter the number of seconds between detecting a dead peer device and actually declaring the peer device dead, triggering the DPD Action. This value should be three times the DPD Delay in order to reduce the risk of false positives.
You can click the “Use defaults” arrow icon in the rightmost column to reset this value to the default value.
SAVE BUTTON
To save any changes made in the Edit IPsec Profile form, click the “Save” button.
Delete Profile
To delete a Profile, click its minus icon button. This will open a confirmation panel asking you to confirm the deletion. If you are certain you want to delete the Profile, click the “OK” button.
Add Profile
Enter an informative, memorable, and unique name for the new Profile in the field at the bottom of the Name column, then click the “Add” button to add it to the IPsec Profiles list.
After adding the Profile, you will need to Edit the Profile to configure it for use. See above.