Overview
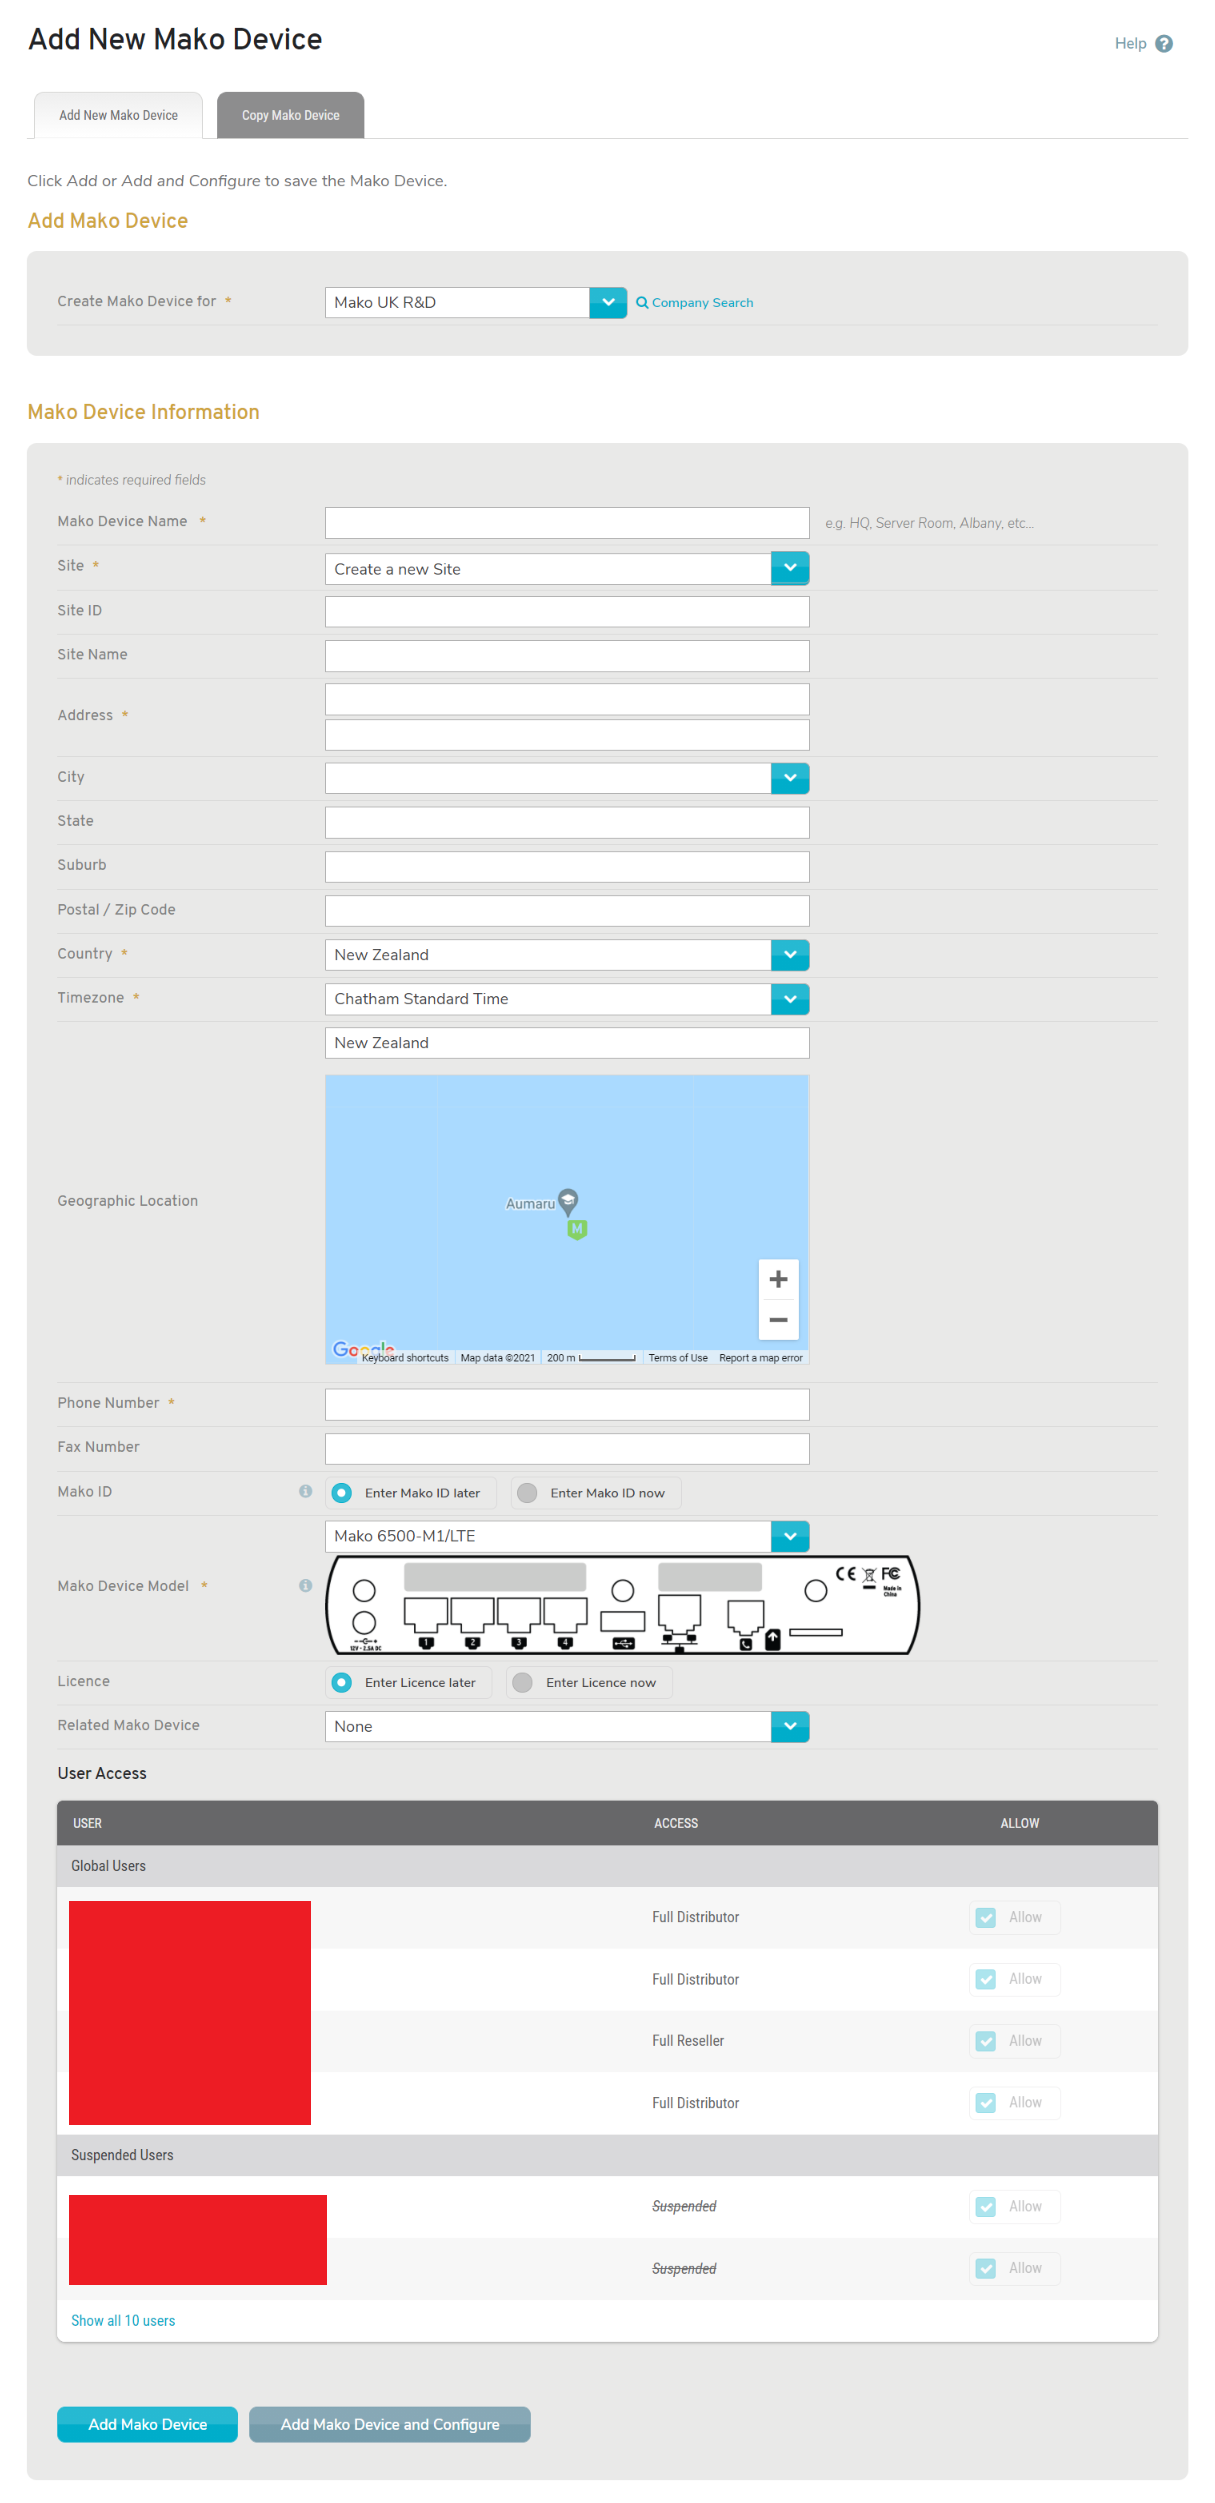
Figure 1. Example Add New Mako Device Page
The Add New Mako Device page (Fig. 1) allows you to add a new Mako device for the selected company by either entering new information manually or copying from an existing Mako device.
Add New Mako Device
The Add New Mako Device tab (Fig. 1) allows you to add a new Mako device for the selected company by entering new information manually.
Company
Choose the company for which this Mako device will be created.
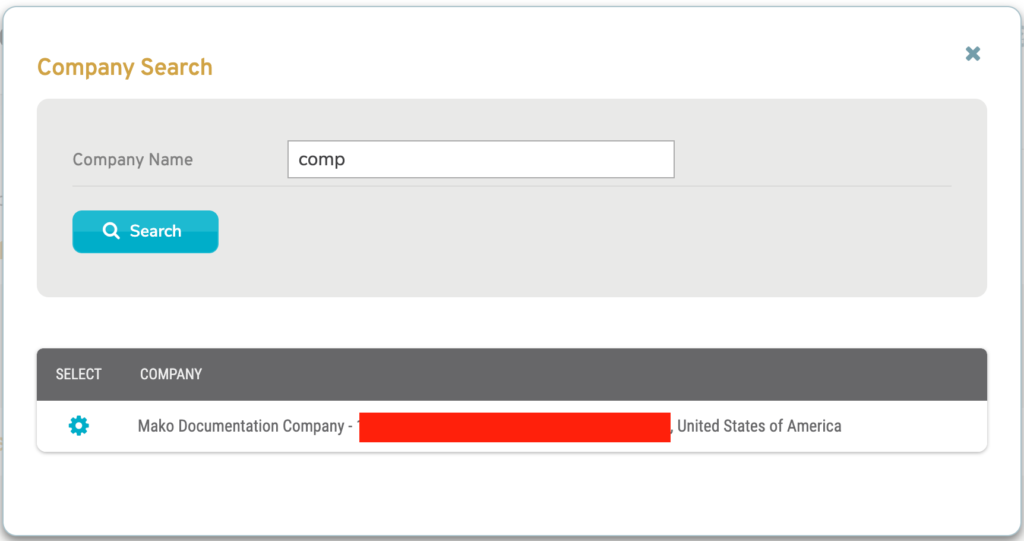
Figure 2. Company Search Page with Company Search Form and Company Search Results
Alternatively, click the “Company Search” link (Fig. 1) to open the Company Search page in a new window (Fig. 2). Enter a search string for Company Name and click the “Search” button to view company search results. Then click the gear icon button for the desired company to select that company in the Add New Mako Device form.
Mako DEvice Information
Mako Device Name
Enter an informative, memorable, and unique name for the Mako device. The Mako Device Name often includes the location of the Mako device.
Site Details
You must either choose an existing Site or provide new Site details for the location of the new Mako device.
Site
Choose an existing Site or choose the “Create a new Site” option to use the fields below to create a new Site.
Site ID (Optional)
If your company uses unique Site IDs for each Site, enter a unique value here for the new Site. If you choose to enter it later, you can do so using the Edit Site form on the Sites >> Manage Site >> Home page. Once a value has been entered for Site ID, it cannot be changed.
Site Name
Enter an informative, memorable, and unique name for the new Site.
Address (Line 1 and Optional Line 2)
Enter a street address in the first field and related information, such as an apartment number, in the optional second field.
Suburb (Optional)
If desired, enter the suburb of the Site address.
City (Optional)
Enter the city or metro area of the Site address. This is optional but recommended.
State (Optional)
Enter the state or region of the Site address. This is optional but recommended.
Postal/ZIP Code (Optional)
Enter the postal code (ZIP Code in the US) of the Site address. This is optional but recommended.
Country
Choose the country of the Site address.
Timezone
Choose the timezone of the Site address.
Phone Number
Enter the phone number of the Site address.
Fax Number (Optional)
If desired, enter the fax number of the Site address.
Mako ID (Optional)
The Mako ID is a unique 12-digit identification printed on the back of every Mako device.
You can choose to enter it later or to enter it now.
If you choose to enter it later, you can do so using the Configure >> Deployment >> Deployment page.
If you choose to enter it now, a field is provided.
While it is optional here, you must eventually specify the Mako ID for the Mako device.
Mako Model
Choose the appropriate model number of the new Mako device.
You can find the model number of a 6000 series Mako in the top line of the serial number sticker on the back of the Mako device.
For other Mako devices, you can compare the back panel configuration with the illustrations that display as you change the selected model number in the dropdown.
The Mako device will be rendered inoperable if the selection you choose here does not match its physical configuration. This may result in a significant delay in service enablement.
License (Optional)
You can choose to enter Licenses later or to enter Licenses now.
If you choose to enter Licenses later, you can do so using the Reports >> Licenses page.

Figure 3. License Fields
If you choose to enter one or more Licenses now, additional fields are provided (Fig. 3). Enter each of your license keys in the field that matches the License Type of the license key:
- Mako Service
- Warranty
- Mako Guardian
- Mako Failover
- PCI DSS
While it is optional here, you must eventually apply at least a service license to the Mako device.
Related Mako (Optional)
Choose a related Mako device from among the selected company’s other Makos, if desired.
Relating Mako devices to one another might be to expedite selection, to indicate hardware redundancy, or to classify by any other grouping criteria.
Give Control to Users
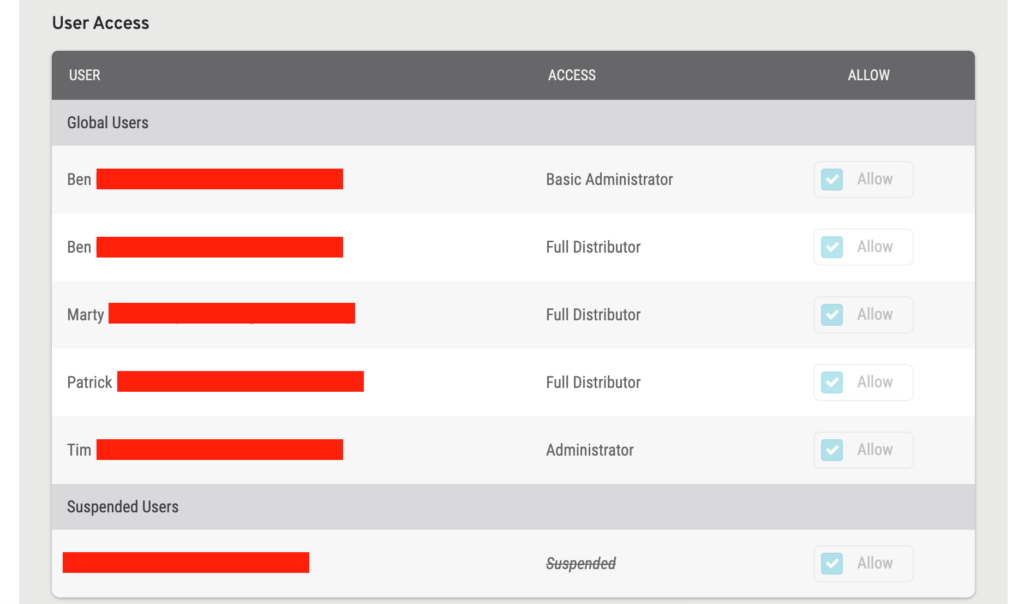
Figure 4. Example User Access List
Use the User Access list (Fig. 4) to control which users will have access to the new Mako device.
Global Users
Global Users have access to all of a company’s Makos and automatically gain access to any new Makos created for the company.
Access for Global Users can be managed on the user’s Access Control page.
While they display here, you cannot control access for Global Users. They will all have access to the new Mako device.
Restricted Users
Restricted Users only have access to a subset of a company’s Makos and do not automatically gain access to newly created Makos.
Access to the new Mako for Restricted Users can be managed here. It can also be managed on the user’s Access Control page or the Mako’s Access page after the new Mako has been created.
Allow Access
Check the checkbox in the Allow column for a user to allow them the access shown in the Access column for the new Mako device.
Deny Access
Uncheck the checkbox in the Allow column for a user to deny them the access shown in the Access column for the new Mako device.
Suspended Users
Suspended Users have had access to their company and/or its Mako devices suspended. Unsuspending a user will restore the access they had directly before being suspended. User accounts that remain suspended for six months will be deleted.
While they display here, you cannot control access for Suspended Users. They will not have access to the new Mako device while suspended.
Add Button
Click the “Add Mako Device” button to create a new Mako device with these settings and remain on this page.
Add and Configure Button
Click the “Add Mako Device and Configure” button to create a new Mako device with these settings and then continue the configuration process for the new Mako device in the Configure section.
Copy Mako Device
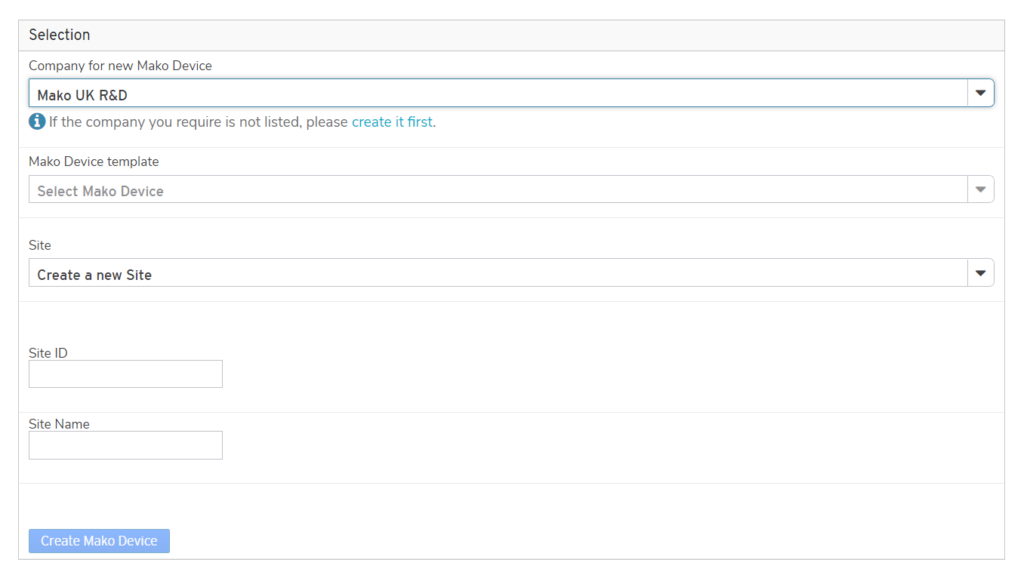
Figure 5. Example Copy Mako Device Tab
The Copy Mako Device tab (Fig. 5) allows you to add a new Mako device by copying an existing Mako device’s details and settings.
Select Mako Device to Copy
Use the Selection form (Fig. 5) to select a Mako device to copy.
Company
Choose the company for the new Mako device. You can use the search field at the top of the list to filter the list, if necessary.
Mako Device
Choose the existing Mako device to use as the template for the new Mako device. You can use the search field at the top of the list to filter the list, if necessary.
Site
After you select a Company, the Site, Site ID, and Site Name fields will appear. You must either choose an existing Site or create a new Site.
Choose an existing Site or choose the “Create a new Site” option to use the fields below to create a new Site.
Site ID (Optional)
If your company uses unique Site IDs for each Site, enter a unique value here for the new Site. If you choose to enter it later, you can do so using the Edit Site form on the Sites >> Manage Site >> Home page. Once a value has been entered for Site ID, it cannot be changed.
Site Name
Enter an informative, memorable, and unique name for the new Site.
Create Mako Device Button
Click the “Create Mako Device” button to open the Create Mako Device form (Fig. 6).
Create Mako Device
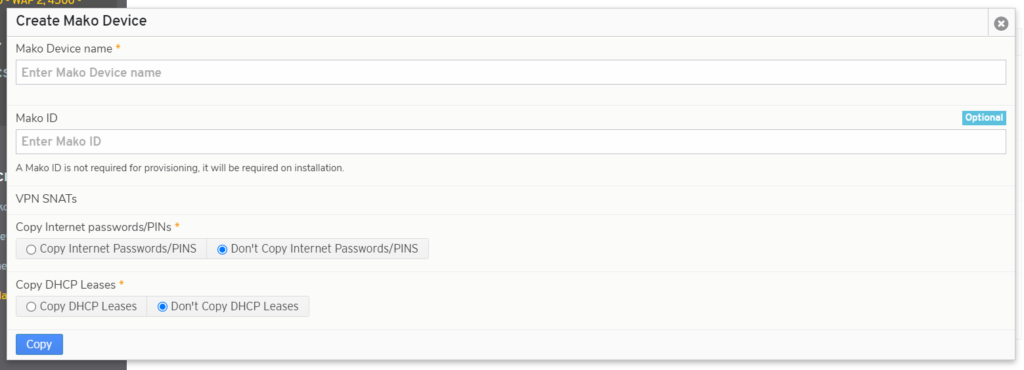
Figure 6. Create Mako Device Form
Use the Create Mako Device form (Fig. 6) to create a new Mako device.
Mako Device Name
Enter an informative, memorable, and unique name for the Mako device. The Mako Name often includes the location of the Mako device.
Mako ID (Optional)
The Mako ID is a unique 12-digit identification printed on the back of every Mako device.
You can choose to enter it later or to enter it now.
If you choose to enter it later, you can do so using the Configure >> Deployment >> Deployment page.
If you choose to enter it now, a field is provided.
While it is optional here, you must eventually specify the Mako ID for the Mako device.
VPN SNATs
If any VPN clouds are set up on the existing Mako device, a field will appear here. Enter a unique Source NAT (SNAT) for any LANs on the new Mako device to be applied when the new Mako device joins the company’s VPN cloud(s).
Internet Passwords/PINs
Choose whether or not to copy Internet passwords/PINs from the template Mako device to the new Mako device. The default setting is NOT to copy these.
DHCP Leases
Choose whether or not to copy DHCP leases from the template Mako device to the new Mako device. The default setting is NOT to copy these.
Copy Button
Click the “Copy” button to create a new Mako device with these settings.
If you created a new Site here, be sure to visit Sites >> Manage Site >> Home to verify or edit the address values for the new Site after you have created the new Mako device.
