This topic is ONLY relevant to security gateways. It is NOT relevant to managed switches.
Overview

Figure 1. Example IPsec Rules Page
The IPsec Rules page (Fig. 1) allows you to manage firewall rules for the selected Mako that affect traffic for each Internet Protocol Security (IPsec) Virtual Private Network (VPN). You can create both basic and advanced VPN firewall rules.
If no custom rules have been created, the default rules will be used. After you select a VPN to manage, that VPN’s default rule will be displayed. The default rule allows all traffic in the directions indicated by the arrow icon (left only, right only, or both left and right). User-defined rules are implemented before the default VPN rule.
User-defined rules are implemented from top to bottom as they appear on this page.
Basic Settings
Use the Basic Settings tab (Fig. 1) to manage basic VPN firewall rules. If you need more control over the handling of VPN traffic than is provided here, you can use the Advanced Settings tab instead.
Select a VPN to Manage

Figure 2. Select a VPN to Manage Form
You must first choose a previously created VPN to manage using the Available VPNs dropdown in the Select a VPN to Manage form (Fig. 2). Then the rest of the tab will be displayed.
Add VPN Rule
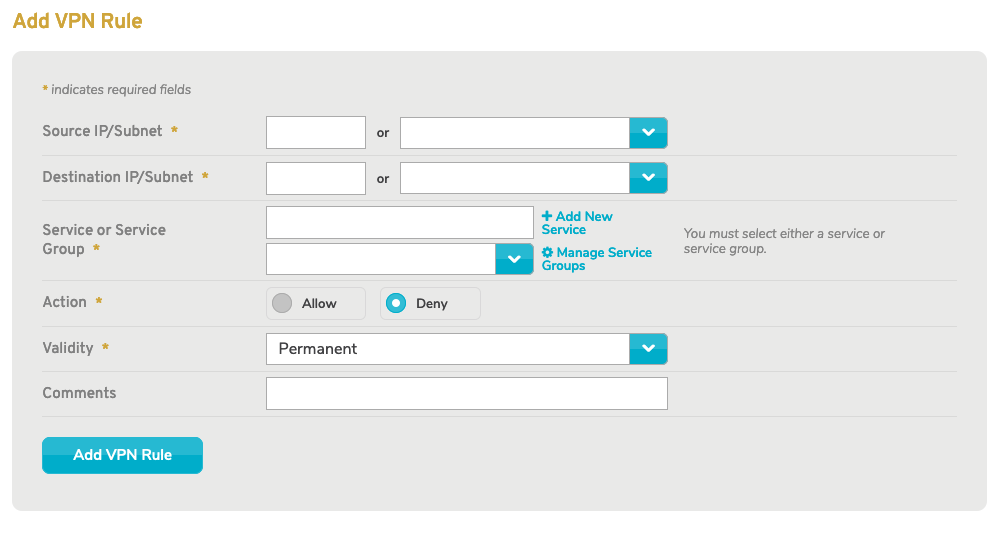
Figure 3. Add VPN Rule Form
Use the Add VPN Rule form (Fig. 3) to add a new IPsec firewall rule for the selected VPN.
Source IP Address
Enter the IP address and network mask (in CIDR notation) that is the source of the VPN traffic to which the new rule will apply. This can be a single device or an entire network.
Alternatively, use the Select a Network dropdown to choose the entire network that is the source of the VPN traffic to which the new rule will apply.
Destination IP Address
Enter the IP address and network mask (in CIDR notation) for the destination of the VPN traffic to which the new rule will apply. This can be a single device or an entire network.
Alternatively, use the Select a Network dropdown to choose the entire network that is the destination of the VPN traffic to which the new rule will apply.
Service Type
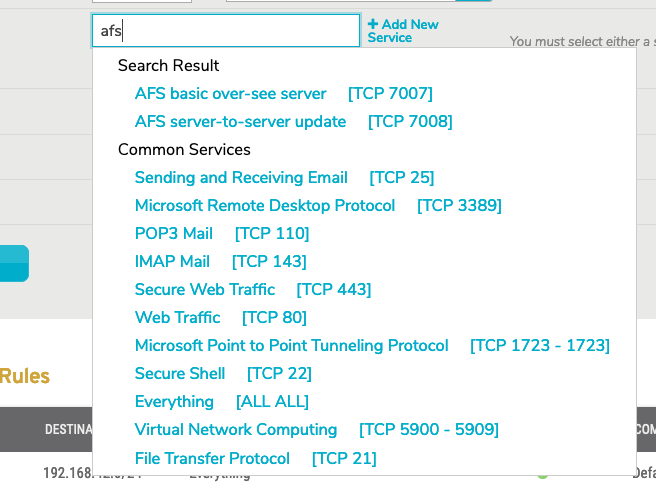
Figure 4. Example Service Type Selector
Use the service type selector (Fig. 4) to specify the service type of the VPN traffic to which the new rule will apply. The service type selector will display a Search Results list as you type. Below the Search Results list, you will see lists of Recent Services (if any have been selected recently) and Common Services. If the desired service type is visible in one of these lists, click the service type to select it. Otherwise, click the “Add new service” link below the selector to open the Add Service page (Fig. 5) in a new window.

Figure 5. Example Add Service Page
Use the Add Service form (Fig. 5) to add a new service type by choosing a Protocol (either “TCP” or “UDP”), entering Start Port and End Port values, and then clicking the “Add Service” button.
Action
Choose whether to allow or deny the VPN traffic to which the new rule will apply. This is set to “Deny” by default. Click the “Allow” radio button to allow the traffic instead.
Comments
Enter any additional comments you may have regarding this rule. These comments are restricted to a maximum of 64 characters.
Add Button
To create the new IPsec firewall rule, click the “Add” button.
Existing Inbound Rules

Figure 6. Example Existing Inbound Rules List
The Existing Inbound Rules list (Fig. 6) is where you can manage existing inbound firewall rules for the selected VPN.
- Source – source IP address and network mask to which the rule applies
- Destination – destination IP address and network mask to which the rule applies
- Service – service type to which the rule applies
- Attributes – icons indicating whether the rule is allowing or denying traffic, whether or not tracing is enabled, and whether or not tracing could degrade performance
- Comments – comments describing the rule
- Options – delete and raise priority buttons
Raise VPN Rule Priority
To raise an inbound VPN firewall rule one position in its list, click its up arrow icon button in the Options column.
Firewall rules are implemented from top to bottom of the list. A good strategy for creating rules here is to create a “deny all traffic” rule first, and then add any exceptions to this rule as rules positioned below it.
Delete VPN Rule
To delete an inbound VPN firewall rule, click its “-” icon button in the Options column. This will open a confirmation panel asking you to confirm the deletion. If you are certain you want to delete the inbound VPN firewall rule, click the “OK” button.
Existing Outbound Rules

Figure 7. Example Existing Outbound Rules List
The Existing Outbound Rules list (Fig. 7) is where you can manage existing outbound firewall rules for the selected VPN.
- Source – source IP address and network mask to which the rule applies
- Destination – destination IP address and network mask to which the rule applies
- Service – service type to which the rule applies
- Attributes – icons indicating whether the rule is allowing or denying traffic, whether or not tracing is enabled, and whether or not tracing could degrade performance
- Comments – comments describing the rule
- Options – delete and raise priority buttons
Raise VPN Rule Priority
To raise an outbound VPN firewall rule one position in its list, click its up arrow icon button in the Options column.
Firewall rules are implemented from top to bottom of the list. A good strategy for creating rules here is to create a “deny all traffic” rule first, and then add any exceptions to this rule as rules positioned below it.
Delete VPN Rule
To delete an outbound VPN firewall rule, click its “-” icon button in the Options column. This will open a confirmation panel asking you to confirm the deletion. If you are certain you want to delete the outbound VPN firewall rule, click the “OK” button.