This topic is ONLY relevant to security gateways. It is NOT relevant to managed switches.
Overview

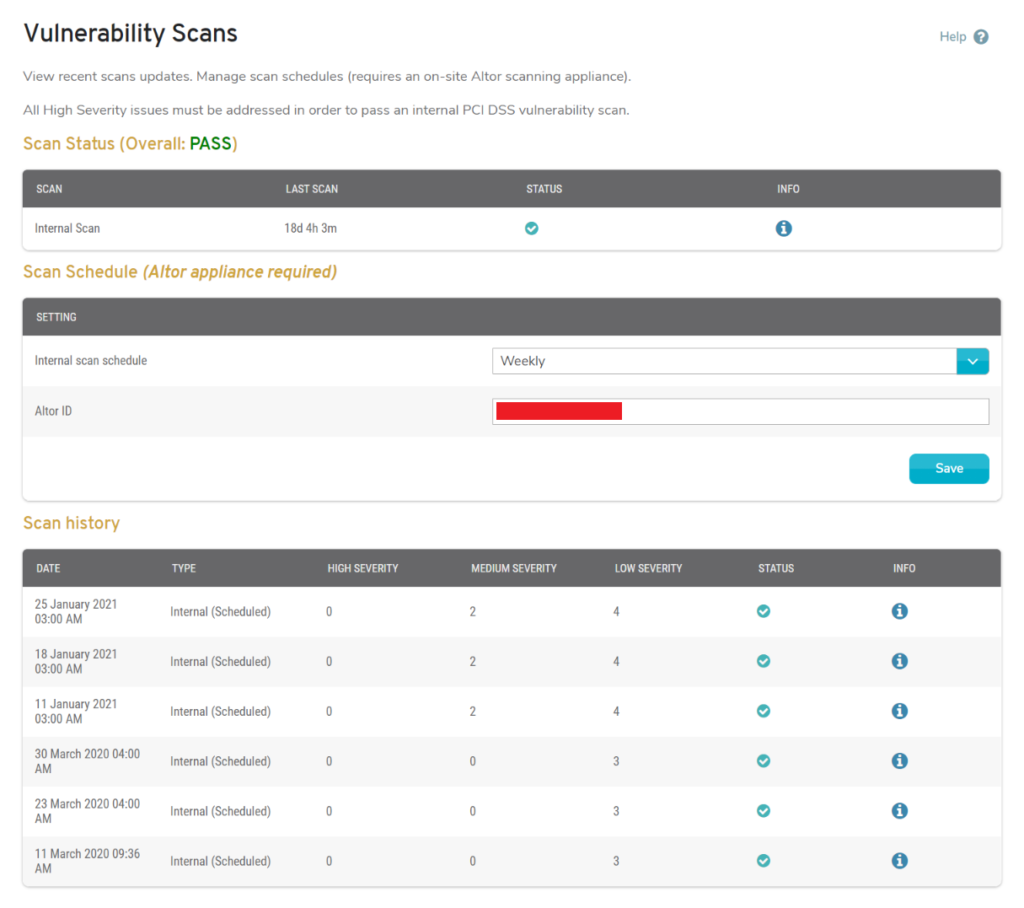
Figure 1. Example Scans Page
The Vulnerability Scans page (Fig. 1) allows you to run quarterly vulnerability scans on your network to identify and resolve any issues and to demonstrate PCI DSS compliance. You can request to run a scan as soon as possible or set a schedule for running scans in the future. There is also a history of past scan activity.
All High Severity and Medium Severity issues must be resolved in order to pass an internal PCI DSS vulnerability scan.
You must pass quarterly network vulnerability scans to be PCI-compliant.
This feature is only available with Mako’s Merchant PCI services. See the PCI DSS Summary documentation for details regarding Merchant PCI services. You must have both an active PCI DSS License and an active PCI Enhanced Services License in order to access Merchant PCI services.
Merchant PCI services require installation of a dedicated scanning appliance in your network and application of firewall settings that allow it to scan restricted zones.
Scan Status

Figure 2. Example Scan Status Summary
The Scan Status summary (Fig. 2) displays the results of the latest network vulnerability scans for the selected Mako.
Overall
An overall “PASS” or “FAIL” status is shown above the list of recent scans.
Columns
- Scan [Type] – whether this was an “Internal” or “External” scan
- Last Scan – date and time of latest scan of this type
- Status – “PASS” or “FAIL” icon indicating result of latest scan of this type
- Info – “i” icon button for additional scan information
Actions
View Scan Information
Click the “i” icon button in the Info column of a scan to view additional scan information in a new window. See the Scan Information documentation below for details.
Scan Schedule

Figure 3. Example Scan Schedule Form
Use the Scan Schedule form (Fig. 3) to run a scan as soon as possible or to set a schedule for running scans in the future.
Scan Now Button
Click the “Scan Now” button to request that a scan be run as soon as possible. The request will be queued on the scanning appliance. Results will appear on this page after the scan has been completed. The scan may take several hours to complete.
Type
Scans initiated from within the LAN will always be “Internal” scans. “External” scans originate from the Internet and are not currently supported.
Schedule
Choose how frequently automated scans should run. Additional fields display based on your selection.
- Disabled – no scheduled runs
- Daily – specify time of day for daily scheduled runs
- Weekly – specify day of week and time of day for weekly scheduled runs
- Monthly – specify day of month and time of day for monthly scheduled runs
- Quarterly – specify day of month and time of day for quarterly scheduled runs
Save Button
Click the “Save” button to save the current Scan Schedule settings.
Scan History

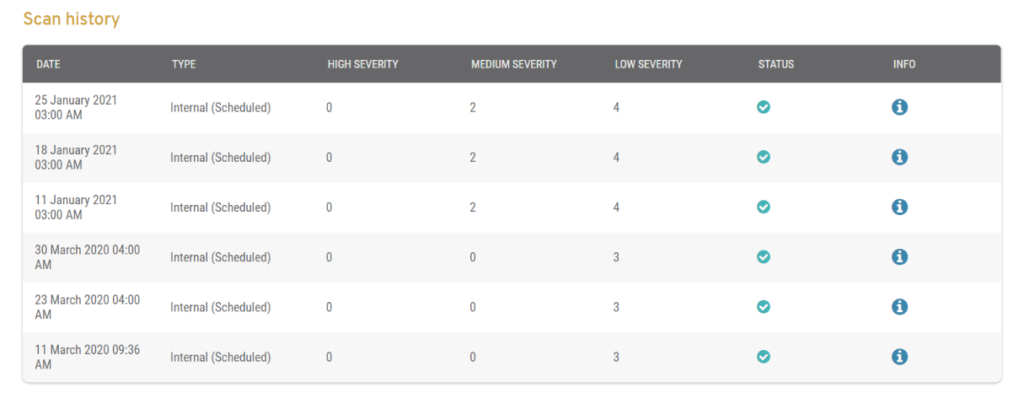
Figure 4. Example Scan History List
The Scan History list (Fig. 4) displays a history of past network vulnerability scans for the selected Mako.
Columns
- Date – date and time of scan
- Type – whether this was an “Internal” or “External” scan
- High Severity – number of High Severity issues
- Medium Severity – number of Medium Severity issues
- Low Severity – number of Low Severity issues
- Status – “PASS” or “FAIL” icon indicating result of scan
- Info – “i” icon button for additional scan information
Actions
View Scan Information
Click the “i” icon button in the Info column of a scan to view additional scan information in a new window. See the Scan Information documentation below for details.
Scan Information

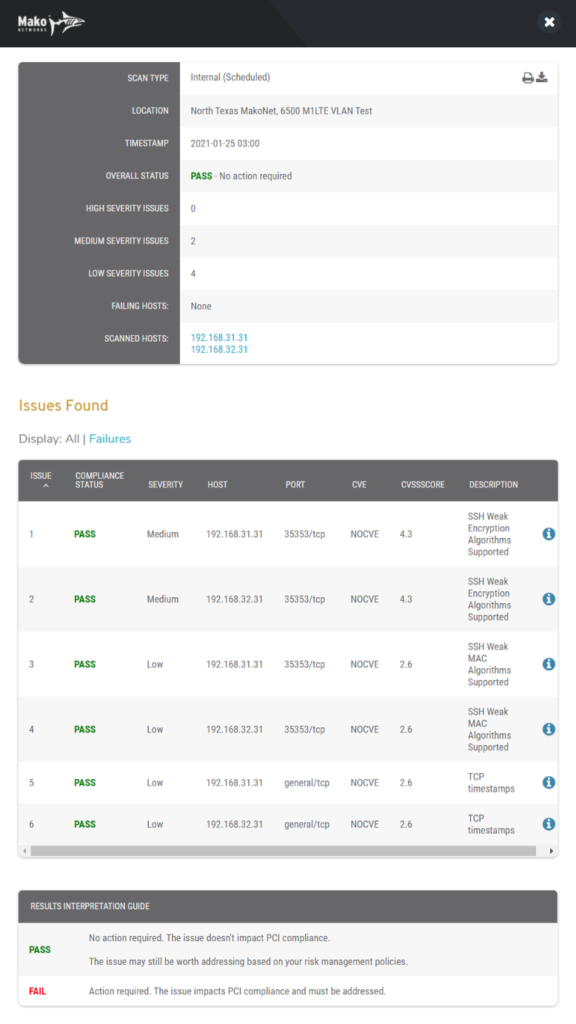
Figure 5. Example Scan Information
Click the “i” icon button in the Info column of a scan to view additional scan information in a new window (Fig. 5).
Detailed Scan Information
- Scan Type – whether this was an “Internal” or “External” scan
- Location – location of selected Mako
- Timestamp – date and time of scan
- Overall Status – “PASS” or “FAIL” result of scan
- High Severity – number of High Severity issues
- Medium Severity – number of Medium Severity issues
- Low Severity – number of Low Severity issues
- Failing Hosts – list of host IP addresses that failed during scan
- Scanned Hosts – list of host IP addresses scanned
- Print Icon Button – button for printing scan information
- Download Icon Button – button for downloading scan information
Results Interpretation Guide
The Results Interpretation Guide explains the status values you will see on individual issues detected by the scan.
PASS
No action required. The issue doesn’t impact PCI compliance.
The issue may still be worth addressing based on your risk management policies.
FAIL
Action required. The issue impacts PCI compliance and must be addressed.
Issues Found
The Issues Found list is a list of all issues detected by the scan. Use this to address any issues with a “FAIL” status.
Common Vulnerabilities
Issues detected by the scan may appear in external lists of common vulnerabilities.
The Common Vulnerabilities and Exposures (CVE) system provides a reference for publicly known cybersecurity vulnerabilities. See https://cve.mitre.org for details.
The Common Vulnerability Scoring System (CVSS) produces a numerical score reflecting a vulnerability’s severity to help organizations assess and prioritize vulnerability management processes. See https://www.first.org/cvss for details.
CVE IDs and CVSS scores are used by the National Vulnerability Database (NVD), the U.S. government repository of standards-based vulnerability management data. This data enables automation of vulnerability management, security measurement, and compliance. See https://nvd.nist.gov for details.
Columns
- Issue – issue identifier
- Compliance Status – “PASS” or “FAIL” status of issue
- Severity – relative severity of issue (“Low,” “Medium,” “High,” or “Critical”)
- Host – host IP address where issue was detected
- Port – port where issue was detected
- CVE – CVE identifier link for detailed CVE information, if applicable
- CVSS Score – numerical score using CVSS methodology
- Description – brief description of issue
- [Information] – “i” icon button for detailed issue information
Actions
View CVE Information
Click a CVE ID link for any issue detected by the scan to view detailed CVE information.
View Issue Information

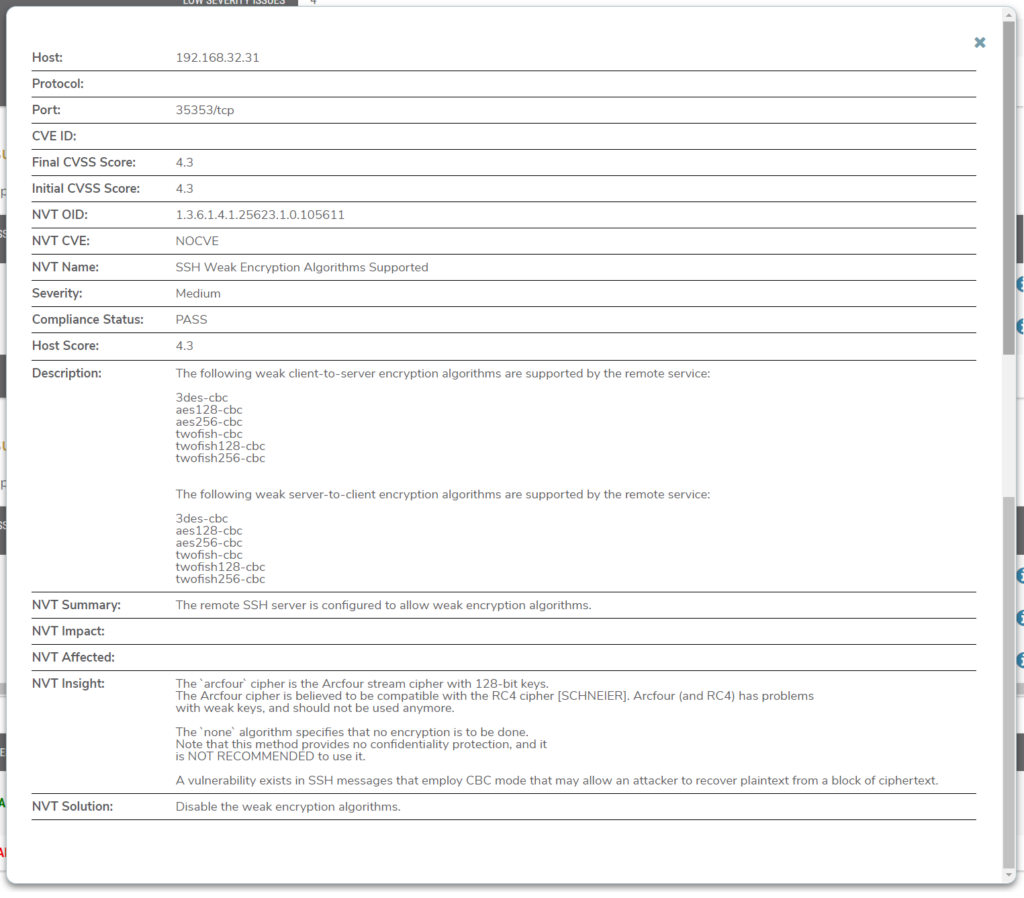
Figure 6. Example Detailed Issue Information
Click an “i” icon button for any issue detected by the scan to view detailed issue information (Fig. 6). The specific fields that display here will depend on the issue.
