This topic is ONLY relevant to security gateways. It is NOT relevant to managed switches.
Overview
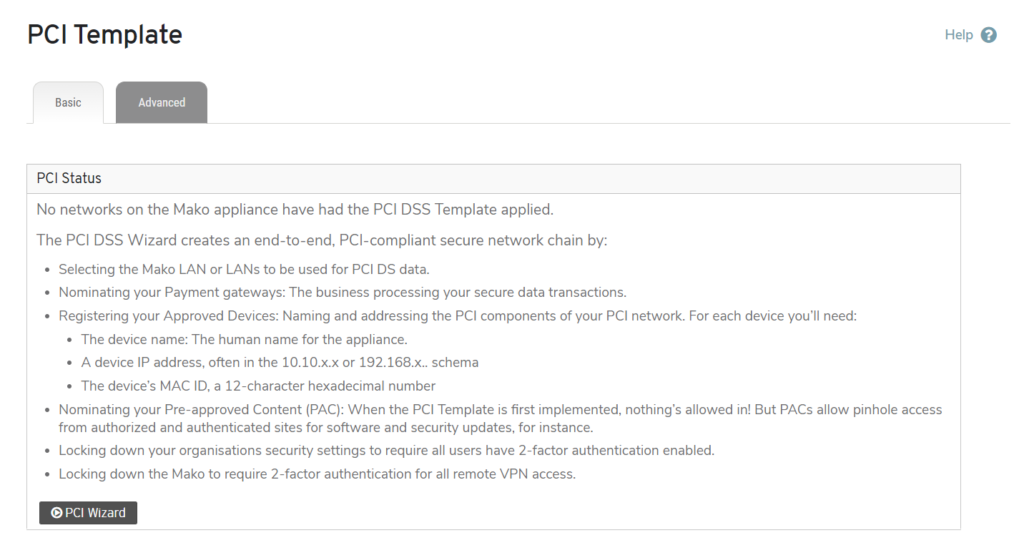
Figure 1. PCI Template Page
The PCI Template page (Fig. 1) in the PCI DSS menu of the Configure section of the Central Management System (CMS) allows you to create an end-to-end, secure network chain in compliance with the Payment Card Industry Data Security Standard (PCI DSS).
You must have a valid PCI DSS License before you can use this page. See the Licenses documentation for details regarding adding a license.
After you have added the license, you will be able to use the PCI DSS Wizard to apply the PCI DSS Template. Applying the PCI DSS Template to networks on the selected Mako will alter your company’s settings to require that all users have multi-factor authentication enabled. It will also alter the Mako’s settings to require multi-factor authentication for all remote VPN access.
After you have applied the PCI DSS Template, you can use the Basic Settings and Advanced Settings tabs to manage PCI DSS settings.
PCI DSS Wizard
If you have not applied the PCI DSS Template to any networks on the selected Mako, use the Basic Settings tab (Fig. 1) to begin the PCI DSS Wizard by clicking the “PCI Wizard” button.
The PCI DSS Wizard guides you through the process of creating an end-to-end, PCI-compliant secure network chain:
- Step 1: Terms and Conditions
- Step 2: Networks
- Step 3: Payment Gateways
- Step 4: Approved Devices
- Step 5: Pre-Approved Content (PACs)
- Step 6: Scans
- Review
- Complete Wizard
Step 1: Terms and Conditions
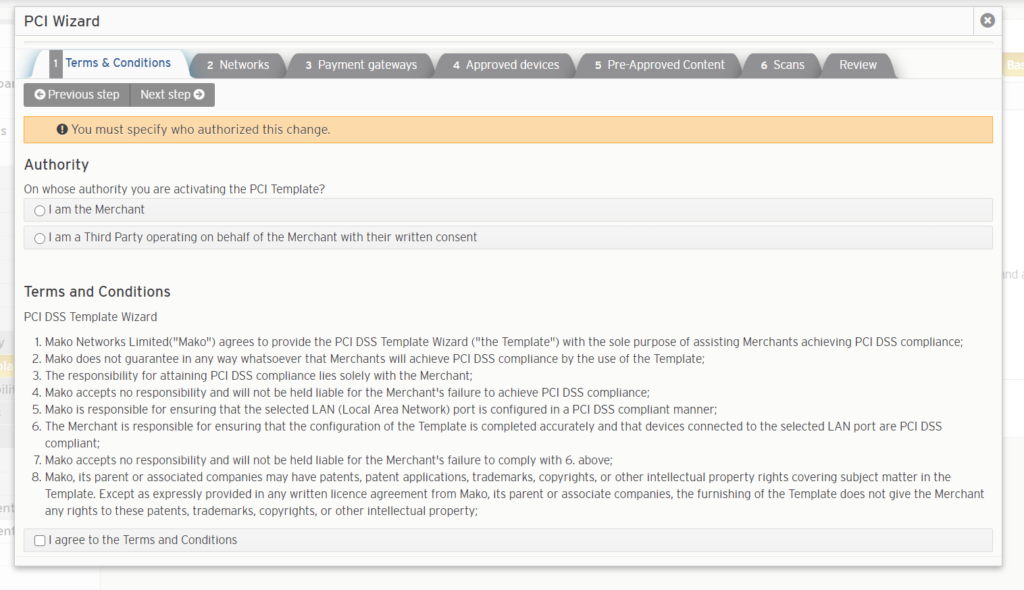
Figure 2. Example Terms and Conditions Step
To use the PCI DSS Template, you must first identify yourself as either the merchant or a third party representing the merchant with written consent and then review and accept the Terms and Conditions displayed in Step 1 (Fig. 2). Read the actual Terms and Conditions carefully in the CMS. The Terms and Conditions shown in this documentation may be out of date.
If you DO NOT agree to the Terms and Conditions, exit the wizard by clicking the “X” button.
If you DO agree to the Terms and Conditions, check the “I agree to the Terms and Conditions” checkbox, then click the “Next Step” button to continue to the next step.
Step 2: Networks
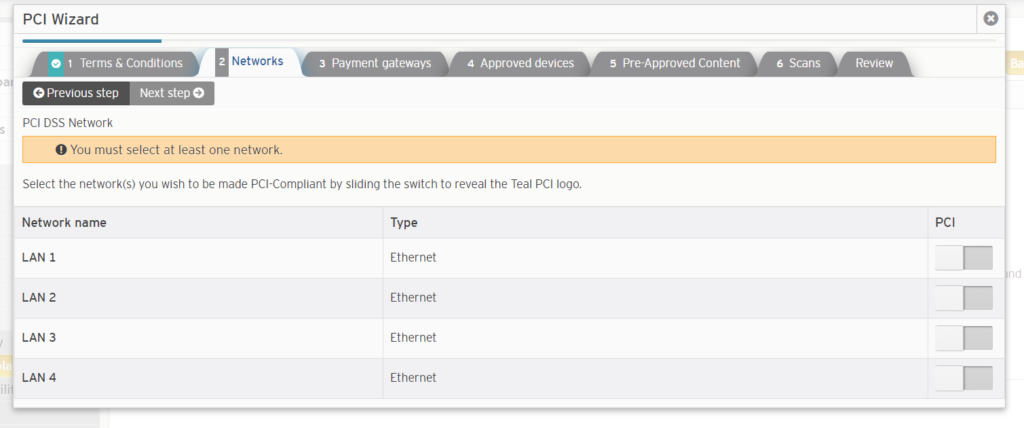
Figure 3. Networks Step
In the Networks step (Fig. 3), select the networks that you want to make PCI compliant. You must have at least one PCI-compliant network to continue.
To select a network, click its blank gray button in the PCI column. To deselect a network, click its teal PCI logo button in the PCI column.
After selecting at least one network, click the “Next Step” button to continue to the next step.
Step 3: Payment Gateways
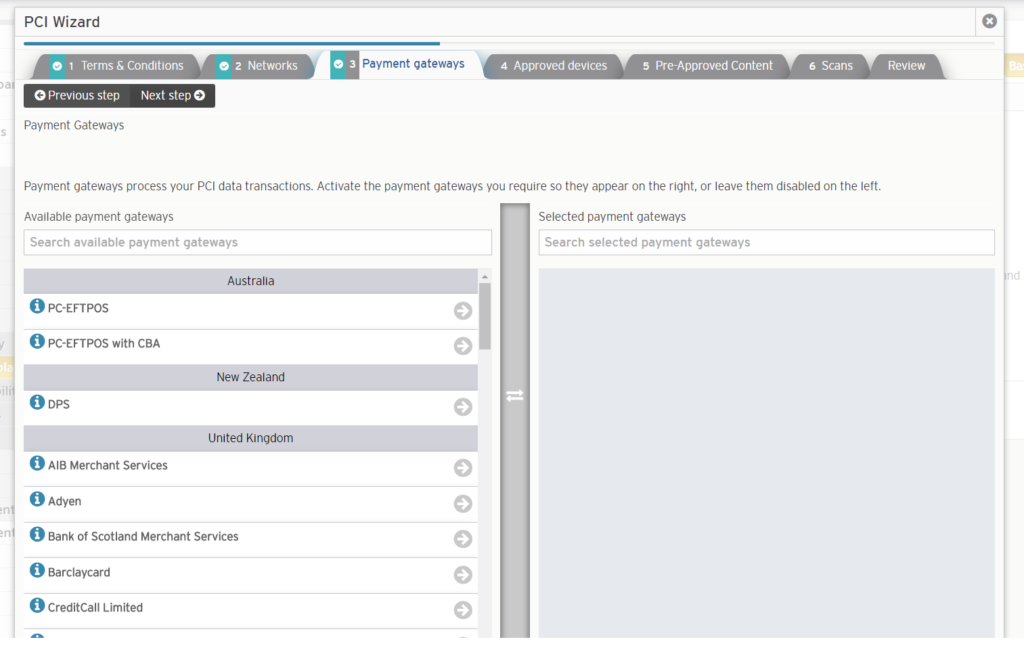
Figure 4. Payment Gateways Step
In the Payment Gateways step (Fig. 4), select the payment gateways that you want to use. Payment gateways process your payment transactions. You must have at least one payment gateway to continue.
To select a payment gateway, click its name in the Available Payment Gateways column on the left. You can also filter the available payment gateways by typing in the search field at the top of the column.
To deselect a payment gateway, click its name in the Selected Payment Gateways column on the right. You can also filter the selected payment gateways by typing in the search field at the top of the column.
For more information regarding a specific payment gateway, click its blue “i” icon button. This will show you the subnets, services, and ports used by the payment gateway.
If you think a payment gateway should be added to the system, contact your CMS administrator or Mako support.
After selecting at least one payment gateway, click the “Next Step” button to continue to the next step.
Step 4: Approved Devices
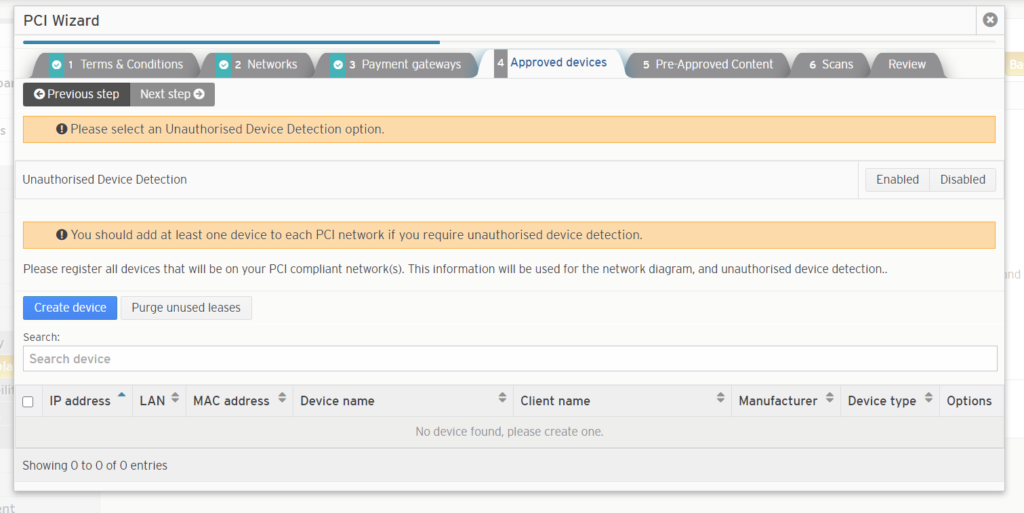
Figure 5. Approved Devices Step
In the Approved Devices step (Fig. 5), select all devices that will be used on your PCI-compliant networks. It is recommended that you add at least one device to each PCI-compliant network.
To select an existing registered device, check its checkbox in the PCI-compliant Devices list. You can also filter the list by typing in the search field at the top of the list.
To select a new device, you must first register the device by clicking the “Create Device” button.
You also are able to edit and delete devices using the gear icon button in the Options column and purge unused DHCP leases using the “Purge Unused Leases” button.
See the DHCP Leases documentation for details regarding all of these actions.
When you are done managing devices, click the “Next Step” button to continue to the next step.
Step 5: Pre-Approved Content (PACs)
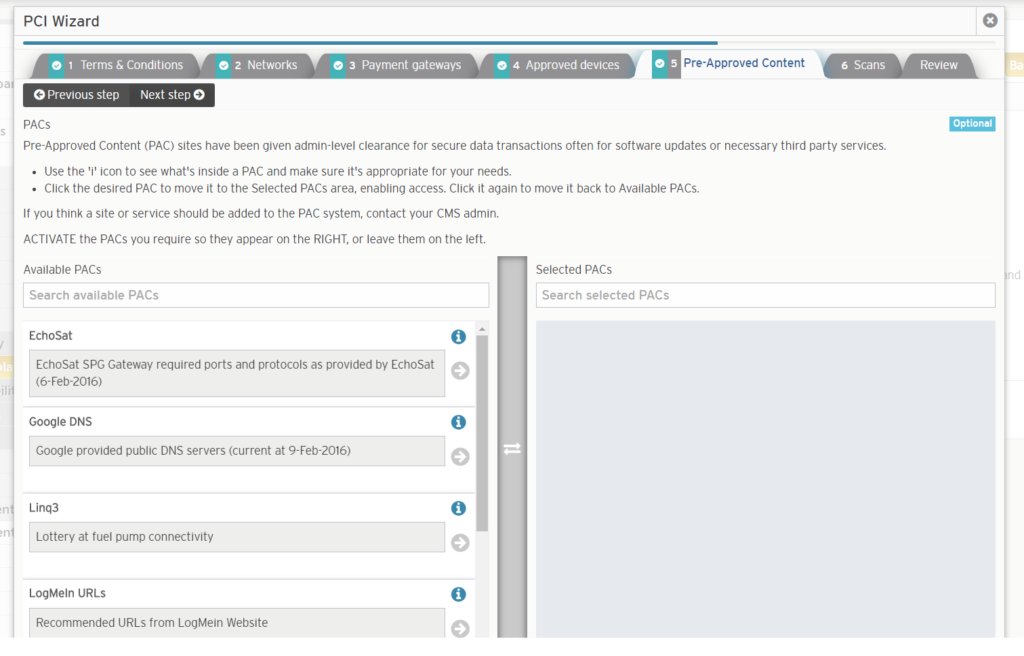
Figure 6. PACs Step
In the optional PACs step (Fig. 6), select the pre-approved content (PAC) sites that you want to allow. These sites are given admin-level clearance for secure data transactions, often for software updates or necessary third-party services.
To select a PAC, click its name in the Available PACs column on the left. You can also filter the available PACs by typing in the search field at the top of the column.
To deselect a PAC, click its name in the Selected PACs column on the right. You can also filter the selected PACs by typing in the search field at the top of the column.
For more information regarding a specific PAC, click its blue “i” icon button. This will show you the subnets, services, and ports used by the PAC.
If you think a site or service should be added to the PAC system, contact your CMS administrator.
When you are done selecting PACs, click the “Next Step” button to continue to the next step.
Step 6: Scans
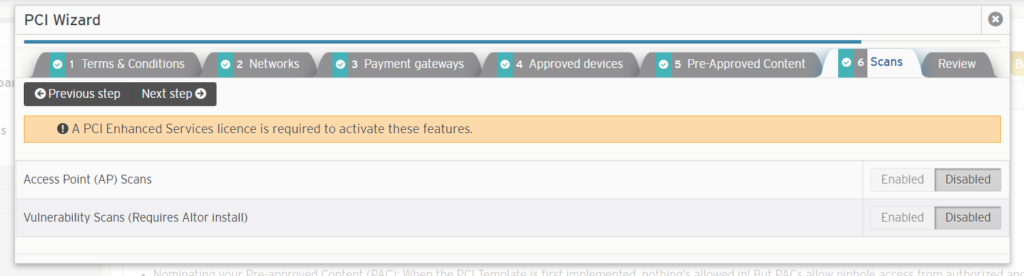
Figure 7. Scans Step
The optional Scans step (Fig. 7) allows you to enable two network scanning features, both of which are disabled by default.
Enabling Access Point (AP) Scans allows you to run AP scans on and around your network to identify and review every wireless access point in your area to demonstrate PCI DSS compliance. You can set a schedule for running automated AP scans and configure related alerts. There is also a summary of AP scan results.
Enabling Vulnerability Scans will allow you to run quarterly vulnerability scans on your network to identify and resolve any security issues and to demonstrate PCI DSS compliance. You can request to run a scan as soon as possible or set a schedule for running scans in the future. There is also a history of past scan activity.
These features are only available with Mako’s Merchant PCI services. See the PCI DSS Summary documentation for details regarding Merchant PCI services. You must have both an active PCI DSS License and an active PCI Enhanced Services License in order to access Merchant PCI services.
Merchant PCI services require installation of a dedicated scanning appliance in your network and application of firewall settings that allow it to scan restricted zones.
Review
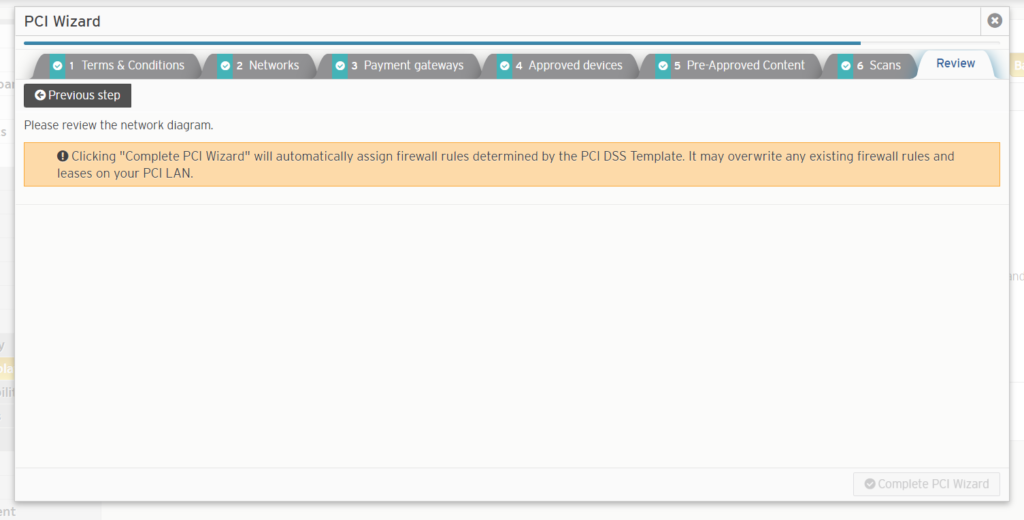
Figure 8. Review Step
In the Review step (Fig. 8), thoroughly review the network diagram generated by the wizard based on your input from the previous steps. The network diagram illustrates how your networks and devices will interact with the CMS, the Internet, and services, such as payment gateways.
Complete Wizard
If after reviewing you are certain you want to complete the wizard, click the “Complete PCI Wizard” button (Fig. 8) to initiate the automated process of applying the PCI DSS Template to the selected Mako.
Completing the Wizard will automatically assign firewall rules determined by the PCI DSS Template. It may overwrite any existing firewall rules and leases on your PCI-compliant networks.
Applying the PCI DSS Template to networks on the selected Mako will alter your company’s settings to require that all users have multi-factor authentication enabled. It will also alter the Mako’s settings to require multi-factor authentication for all remote VPN access.
Basic Settings

Figure 9. Basic Settings Tab
Use the Basic Settings tab (Fig. 9) to manage the most common PCI DSS settings.
PCI Status
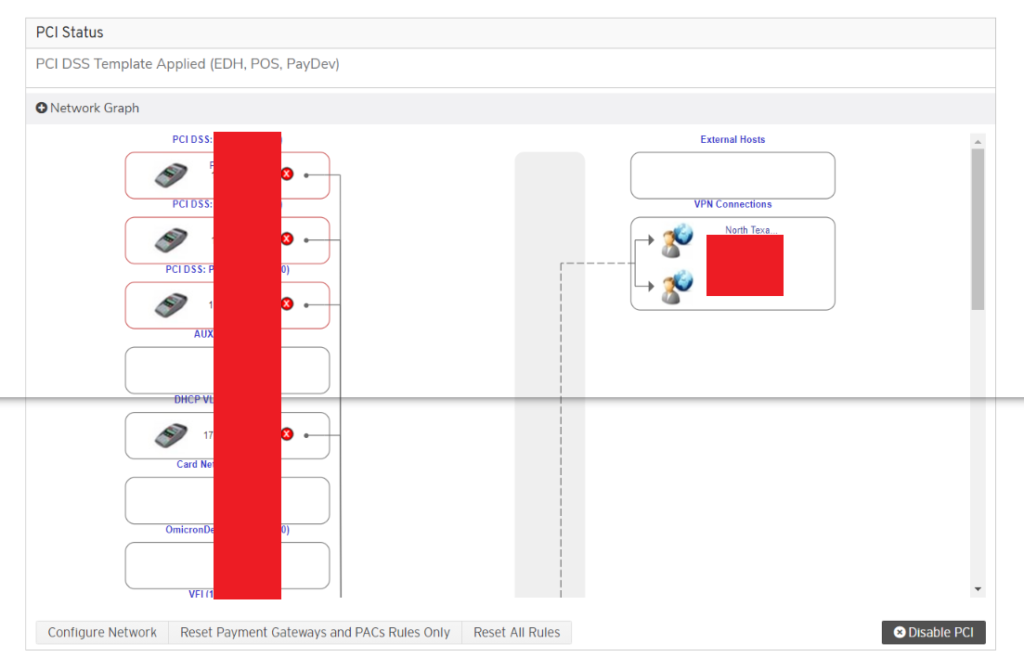
Figure 10. PCI Status Panel
The PCI Status panel (Fig. 10) displays a note regarding where the PCI DSS Template has been applied and a network diagram illustrating your network. You can also manage the network configuration, reset rules, and disable the PCI DSS Template.
Network Diagram
The network diagram, or graph, illustrates your network’s connection to the Mako, then to the Internet, and then to any and all services that your company might use. It includes specific details about your network like the IP addresses of your payment gateways or LANs. You may also see the DHCP leases of devices you have registered.
Delete DHCP Lease
To delete a device’s DHCP lease, click its red “X” icon button. This will open a confirmation panel asking you to confirm the deletion. If you are certain you want to delete the DHCP lease, click the “OK” button.
Configure Network
To manage your approved devices, click the “Configure Network” button. Refer to the PCI DSS Wizard Step 4: Approved Devices documentation above for details.
Reset Payment Gateways and PACs Rules Only
To reset only those rules for payment gateways and PACs back to default settings, click the “Reset Payment Gateways and PACs Rules Only” button. This will open a confirmation panel asking you to confirm this action. If you are certain you want to continue, click the “OK” button.
Reset All Rules
To reset all rules back to default settings, click the “Reset All Rules” button. This will open a confirmation panel asking you to confirm this action. If you are certain you want to continue, click the “OK” button.
Disable PCI DSS Template
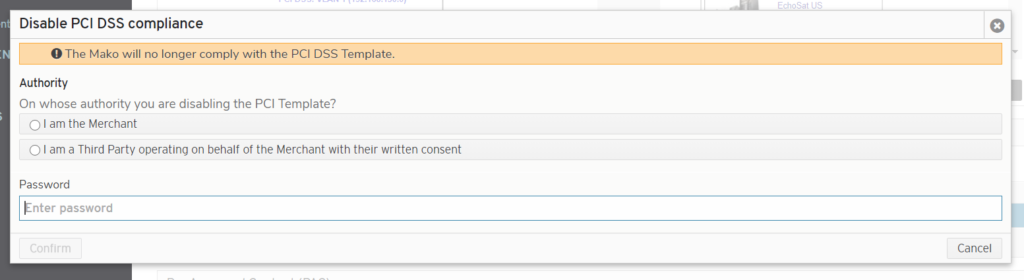
Figure 11. Example Disable PCI DSS Template Confirmation Panel
To disable the PCI DSS Template, click the “Disable PCI” button. This will open a confirmation panel (Fig. 11) asking you to confirm this action. If you are certain you want to disable the PCI DSS Template, identify yourself as either the merchant or a third party representing the merchant with written consent, enter your password for security purposes, and then click the “Confirm” button. This will result in your network NOT being PCI compliant.
Payment Gateway Information
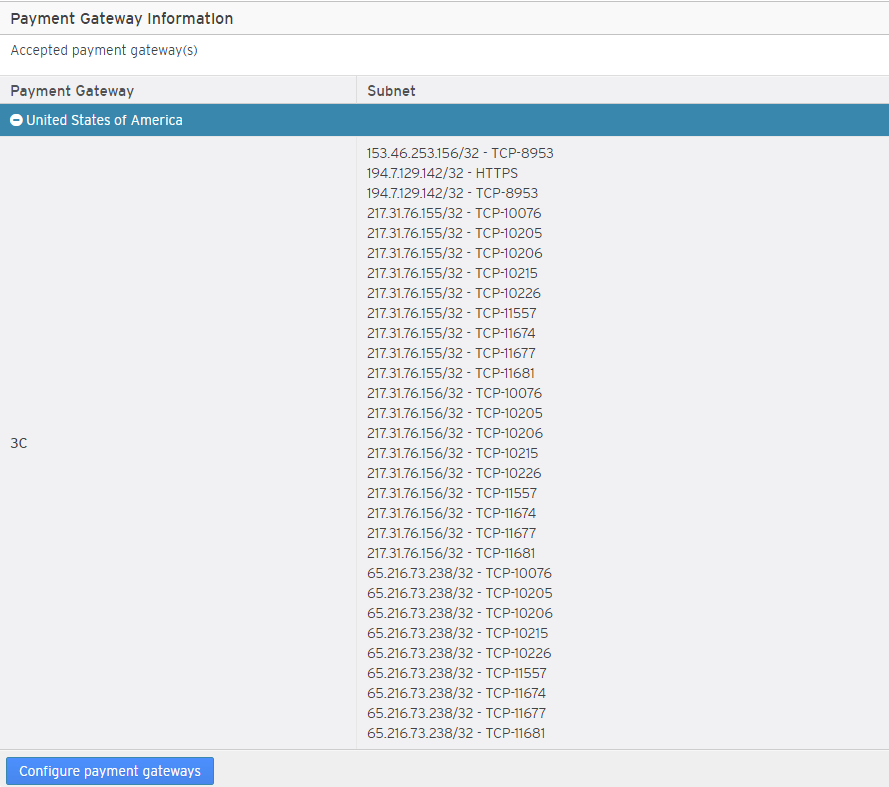
Figure 12. Example Payment Gateway Information List
The Payment Gateway Information list (Fig. 12) displays the name and subnets for each existing Payment Gateway entry, grouped by country.
To manage your Payment Gateway entries, click the “Configure Payment Gateways” button. Refer to the PCI DSS Wizard Step 3: Payment Gateways documentation above for details.
Pre-Approved Content (PAC)
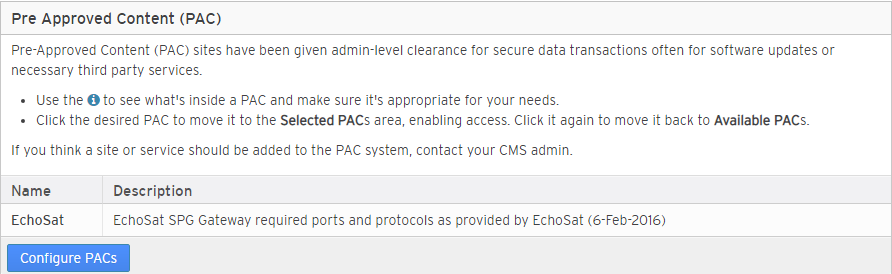
Figure 13. Example Pre-Approved Content List
The Pre-Approved Content list (Fig. 13) displays the name and description for each existing PAC entry.
To manage your PAC entries, click the “Configure PACs” button. Refer to the PCI DSS Wizard Step 5: Pre-Approved Content (PACs) documentation above for details.
Advanced Settings
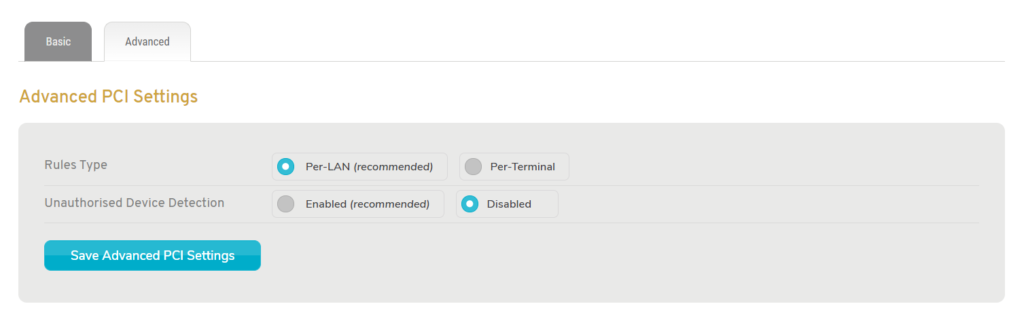
Figure 14. Advanced Settings Tab
Use the Advanced PCI Settings form on the Advanced Settings tab (Fig. 14) to manage less common PCI DSS settings.
Policy Updates
Choose to have either “Automatic” or “Manual” Policy Updates after changes are made to the PCI DSS Template. This is set to “Automatic” by default, which is the recommended option and will automatically update policies after changes are made. The “Manual” option requires a manual reset of the rules in order for changes to take effect. The “Manual” option is only available for certain legacy users. Once you have this set to “Automatic” you cannot switch it back to “Manual.”
Changing this setting will re-initialize the PCI DSS Template.
Rules Type
Choose to have either a “Per-LAN” or “Per-Terminal” Rules Type. This is set to “Per-LAN” by default, which is the recommended option. To change this behavior, click the “Per-Terminal” option, which allows you to manage policies for each device on the PCI-compliant LAN.
If Policy Updates are set to “Manual” the Rules Type setting is not available.
Unauthorized Device Detection
Choose to either enable or disable Unauthorized Device Detection. This is set to “Enabled” by default, which is the recommended option. When enabled, any unregistered MAC address will be logged, will trigger an alert, and will be blocked from Internet access. To disable this, click the “Disabled” option.
Unauthorized devices will not be able to connect to the Internet regardless of this setting; it is only for logging and alerting purposes.
Save Button
To save any changes to the advanced settings, click the “Save Advanced PCI Settings” button.