Overview
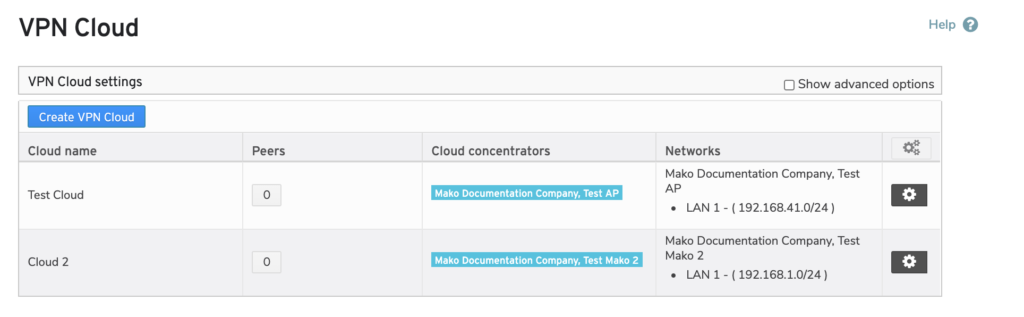
Figure 1. Example VPN Cloud Page
The VPN Cloud page (Fig. 1) allows you to create and manage VPN Clouds for the selected company.
Create VPN Cloud
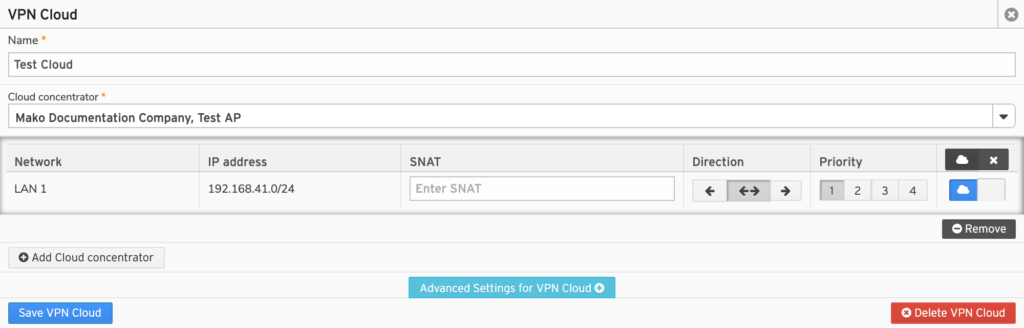
Figure 2. Create VPN Cloud Form
To create a new VPN Cloud, click the “Create VPN Cloud” button to open the Create VPN Cloud form (Fig. 2).
Name
Enter a unique, informative, and memorable name for the VPN Cloud.
Cloud Concentrator
Choose a Cloud Concentrator device registered for the selected the company, then configure it using the set of fields that appears below the dropdown field.
Mako Networks
Choose the LAN segments on the Cloud Concentrator that the peer networks will use to connect to this VPN Cloud.
To deselect a network, click its blue cloud icon button.
To select a network, click its gray “X” icon button.
To deselect ALL networks shown, click the dark gray “X” icon button at the top of the list.
To select ALL networks shown, click the dark gray cloud icon button at the top of the list.
In addition to selecting the Mako networks to connect to this VPN Cloud, you are able to customize the SNAT, direction, and priority for each network connection.
SNAT
Enter a SNAT value for each selected network, as needed.
Direction
Choose a traffic direction for each selected network using its arrow icon buttons.
Click the button with two left-facing arrows (unidirectional to Mako network) to have the Mako network only receive data and the VPN Cloud only send data.
Click the button with one left-facing arrow and one right-facing arrow (bidirectional) to have the Mako network and the VPN Cloud both sending and receiving data.
Click the button with two right-facing arrows (unidirectional to VPN Cloud) to have the Mako network only send data and the VPN Cloud only receive data.
Priority
Choose a priority for each selected network using its “1” through “4” buttons, with “1” being the highest priority and “4” being the lowest priority. Connections set to the same priority are treated equally.
Remove Cloud Concentrator
Click the “Remove” button below a Cloud Concentrator configuration to remove it from the VPN Cloud. You must configure at least one Cloud Concentrator.
Add Cloud Concentrator
Click the “Add Cloud Concentrator” button to display an additional set of fields for choosing and configuring an additional Cloud Concentrator. Repeat, as needed. Additional Cloud Concentrators are typically used for redundancy.
Advanced Settings for VPN Cloud

Figure 3. Advanced Settings Fields
Click the “Advanced Settings for VPN Cloud” button to display the Advanced Settings fields (Fig. 3).
Cipher Suite
A cipher suite is a set of algorithms that help secure the network connections between the Mako and the VPN cloud.
Choose your desired cipher suite using the dropdown.
If you do not know what to choose or do not have a preference, use the default setting of “Automatic.”
Certificate Authority Lifetime
Choose the number of years (from 1 to 30) that certificate authority certificates can live before expiring. The default value is ten years.
Peer Certificate Lifetime
Choose the number of years (from 1 to 29) that peer certificates can live before expiring. The default value is five years.
Mesh Routing
Choose whether or not to enable mesh routing. When enabled, this allows peer networks to communicate with each other directly without tunneling traffic to the concentrator.

Figure 4. Supernet Row in Mako Networks List
Enabling Mesh Routing adds a Supernet row (Fig. 4) to the Mako Networks list. This can be used to add Supernets to the list. You can enter an IP address with subnet mask and also set direction and priority values for each Supernet. To remove a Supernet, click its “Remove” button. Disabling Mesh Routing will delete the Supernets.
Suggest Temporary Connections
If you have enabled Mesh Routing, you can also choose whether or not to enable temporary connections. When enabled, peers needing to communicate with each other will be temporarily connected automatically. The temporary connection will remain open as long as there is traffic flowing. Once traffic stops, the temporary connection will close.
VPN Concentrator Interconnect
Choose whether or not to allow more than one VPN concentrator to act as the primary concentrator for the Mako VPN Cloud.
Allow Duplicate SNATs
Choose whether or not to allow duplicate SNAT values.
SNAT IP Mapping
Choose from the following options:
- Auto (1:1 Mapping)
- Manual
- (Legacy)
The default value is “Auto (1:1 Mapping).”
Save VPN Cloud Button
Click the “Save VPN Cloud” button to create a new VPN Cloud with these settings.
View VPN Clouds
Figure 5. Example VPN Cloud List
Use the VPN Cloud list (Fig. 5) to manage existing VPN Clouds.
Columns
- Cloud Name – name of VPN Cloud
- Peers – peer details button
- Cloud Concentrators – list of cloud concentrators; recreate certificate button (advanced)
- Networks – list of enabled local networks
- [Options] – edit button; recreate certificates button (advanced)
Actions
View Peers

Figure 6. Peers List
To view a VPN Cloud’s peers, click its button in the Peers column. This will open the Peers list (Fig. 6). Here you can see the Name, LAN, and SNAT values for each peer. You can enter a search string in the search field at the top of the list to filter the list by Name matches. You can also click a peer Mako’s Name link to be redirected to its VPN Cloud settings page.
Edit VPN Cloud
Figure 7. Edit VPN Cloud Form
To edit a VPN Cloud, click its gear icon button in the Options column. This will open the Edit VPN Cloud form (Fig. 7).
For more details regarding these settings, see the Create VPN Cloud documentation above.

Figure 8. Save VPN Cloud Confirmation
Make any desired changes, then click the “Save VPN Cloud” button to open the Save VPN Cloud confirmation (Fig. 8). If you are certain you want to save these changes for this VPN Cloud, enter your current password and click the “Confirm” button.
Delete VPN Cloud
To delete a VPN Cloud, first click its gear icon button in the Options column. This will open the Edit VPN Cloud form (Fig. 7).

Figure 9. Delete VPN Cloud Confirmation
Then click the “Delete VPN Cloud” button to open the Delete VPN Cloud confirmation (Fig. 9). If you are certain you want to delete this VPN Cloud, enter your current password and click the “Confirm” button.
Recreate Certificates
If you need to recreate any certificates, check the Show Advanced Options checkbox to display red arrow icon buttons for this in the VPN Cloud list.
Any VPN Cloud you use must support certificate-based security. This allows you to revoke/regenerate the security certificate used for these connections periodically, which is recommended as a security best practice.

Figure 10. Recreate Certificate Confirmation for a Cloud Concentrator
To recreate the certificate for a specific Cloud Concentrator in a VPN Cloud, click its red arrow icon button in the Cloud Concentrator column. This will open the Recreate Certificate confirmation (Fig. 10). If you are certain you want to recreate the certificate for this Cloud Concentrator, enter your current password and click the “Confirm” button.

Figure 11. Recreate Certificates Confirmation for a VPN Cloud
To recreate all certificates for an entire VPN Cloud, click its red arrow icon button in the VPN Cloud column. This will open the Recreate Certificates confirmation (Fig. 11). If you are certain you want to recreate all certificates for this VPN Cloud, enter your current password and click the “Confirm” button.