Overview
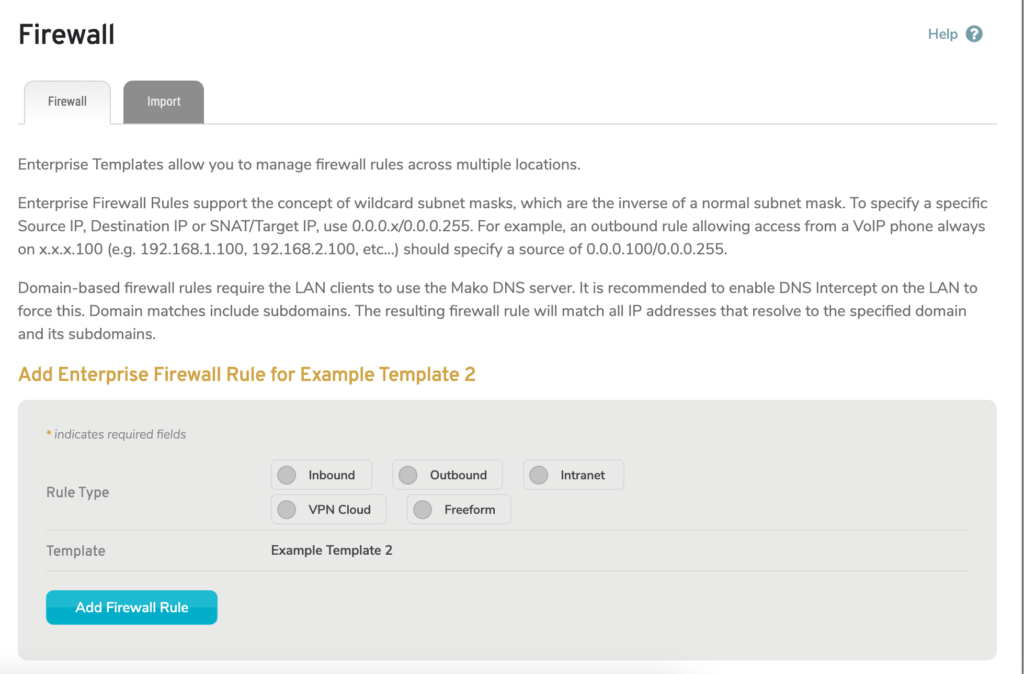
Figure 1. Example Firewall Page
The Firewall page (Fig. 1) allows you to manage firewall rules for the selected Enterprise Template.
Enterprise Template Match Criteria
Enterprise Template Match Criteria are used to identify which LANs, WANs, and/or VPN Clouds are affected by the firewall rule.
The main Match Criteria conditions are shown below in Table 1.
| Condition | Description |
|---|---|
| INF_NAME=[value] | Matches a LAN/WAN by its name.
Use a value that exactly matches the network’s name, e.g. “INF_NAME=LAN 1” |
| INF_DEV=[value] | Matches a LAN/WAN by its device name or normalized device name.
Use a value that exactly matches the network’s device name or normalized device name (see list below), e.g. “INF_DEV=cell1” |
| LAN | Matches all LANs. |
| MAKO_LABEL=[value] | Matches a Mako by one of its labels.
Use a value that exactly matches the label, e.g. “MAKO_LABEL=two-cameras” |
| MAKO_METADATA_KEY=[value] | Matches a Mako by one of its metadata keys
Use a value that exactly matches the metadata key, e.g. “MAKO_METADATA_KEY=voip-account” |
| PCI_LAN | Matches all PCI LANs. |
| VPN_CLOUD_NAME=[value] | Matches a VPN Cloud by its name.
Use a value that exactly matches the VPN Cloud’s name, e.g. “VPN_CLOUD_NAME=Cloud 1” |
| WAN | Matches all WANs by creating a rule for each WAN. |
| WAN_ANY | Matches all WANs by creating one rule that covers all WANs. |
| WAN_PRIORITY=[value] | Matches a WAN by its priority.
Use a numerical value that matches the priority, e.g. “WAN_PRIORITY=1” |
Table 1. Enterprise Template Match Criteria
Match Criteria conditions and any included values are CASE SENSITIVE.
Use INF_DEV instead of INF_NAME conditions whenever possible, as those rules will continue to work even if the LAN is renamed.
Specify multiple conditions by using commas (“,”) to separate the conditions, e.g. “INF_DEV=lan1, MAKO_LABEL=two-cameras”
Specify multiple values for a condition by using two pipes (“||”) to separate the values, e.g. “INF_DEV=lan1||lan3”
Normalized Device Names
- cell1
- dsl1
- lan1
- lan2
- lan3
- lan4
- lan4
- wan1
- wan2
- wlan0
- wlan0_1
- wlan0_2
- wlan0_3
- vlan<ID>
Normalized device names are universal across all hardware models.
Enterprise Template Subnet Matching
Enterprise Template firewall rules support the concept of wildcard subnet masks, which are the inverse of a normal subnet mask. To specify a specific Source IP, Destination IP or SNAT/Target IP, use “0.0.0.x/0.0.0.255”.
For example, an outbound rule allowing access from a VoIP phone always on x.x.x.100 (e.g. 192.168.1.100, 192.168.2.100, etc…) should specify a source of “0.0.0.100/0.0.0.255”.
Domain-based Firewall Rules
Domain-based firewall rules match the domain and all subdomains, e.g. “example.com” will match both example.com and www.example.com. The rule will also match all IP addresses that resolve to the specified domain and its subdomains.
Domain-based firewall rules require that clients use the Mako’s built-in DNS service. You can force all clients on a LAN to use the Mako’s DNS service by enabling the DNS Intercept option for the LAN.
WARNING: Domain-based firewall rules should only be used where the DNS server is secured from tampering, otherwise there is a risk of an intercepted DNS query providing the wrong IP information for the domain, resulting in the firewall rule allowing access to an unintended destination.
Add Firewall Rule

Figure 2. Initial Add Enterprise Firewall Rule Form
Use the Add Enterprise Firewall Rule form (Fig. 2) to create a new firewall rule.
Rule Type
Choose one of the following rule types to display the full form.
Inbound
Inbound firewall rules affect traffic inbound from WANs to Makos.
If you choose “Inbound” you are prompted to provide two values that will be used to populate certain fields in the form:
- Inbound WAN name (leave blank to match any WAN)
- Destination LAN name
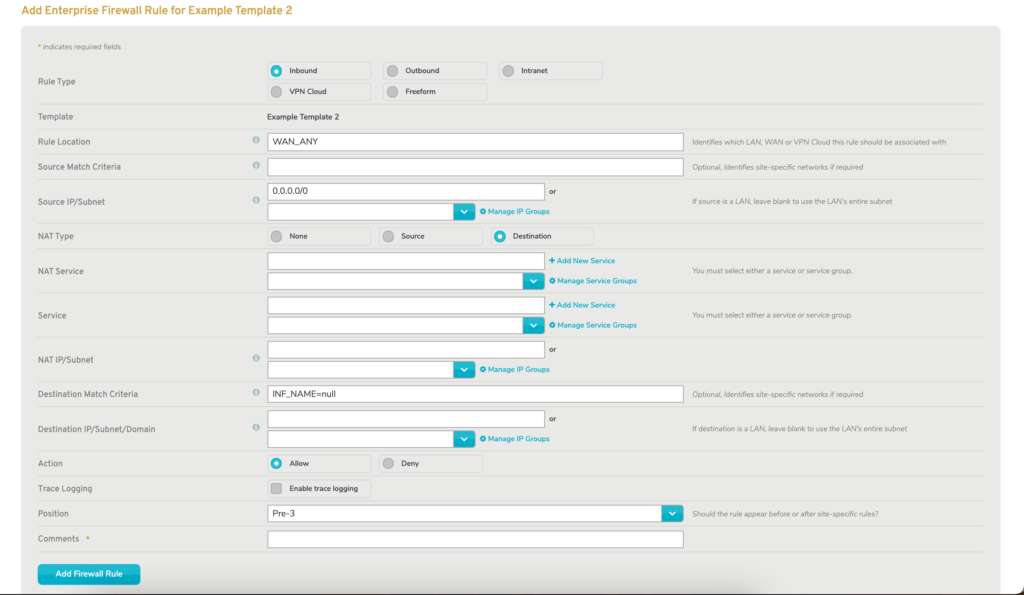
Figure 3. Add Enterprise Firewall Rule Form for Inbound Rules
The full form is displayed with certain fields populated (Fig. 3).
Outbound
Outbound firewall rules affect traffic outbound to WANs from Makos.
If you choose “Outbound” you are prompted to provide two values that will be used to populate certain fields in the form:
- Source LAN name
- Outward WAN name (leave blank to match any WAN)
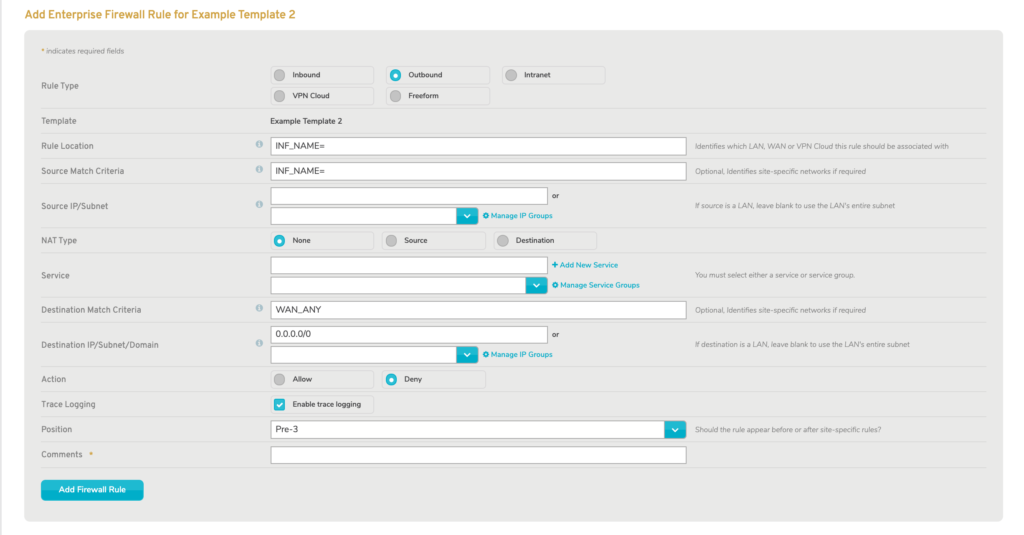
Figure 4. Add Enterprise Firewall Rule Form for Outbound Rules
The full form is displayed with certain fields populated (Fig. 4).
Intranet
Intranet firewall rules affect traffic within LANs on Makos.
If you choose “Intranet” you are prompted to provide two values that will be used to populate certain fields in the form:
- Source LAN name
- Destination LAN name

Figure 5. Add Enterprise Firewall Rule Form for Intranet Rules
The full form is displayed with certain fields populated (Fig. 5).
VPN Cloud
VPN Cloud firewall rules affect traffic using VPN Clouds on Makos.
If you choose “VPN Cloud” you are prompted to provide three values that will be used to populate certain fields in the form:
- VPN Cloud name
- Source LAN name (if applicable)
- Destination LAN name (if applicable)
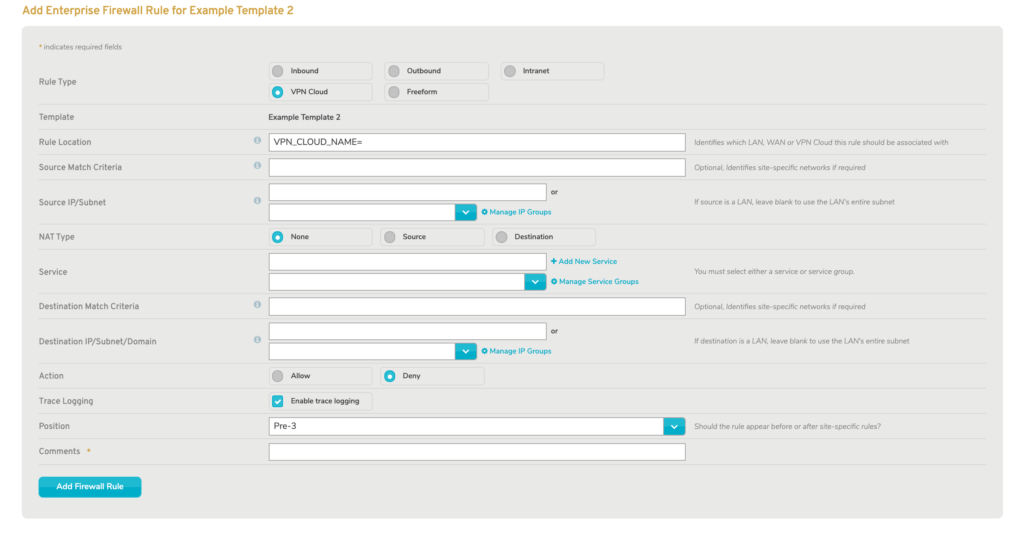
Figure 6. Add Enterprise Firewall Rule Form for VPN Cloud Rules
The full form is displayed with certain fields populated (Fig. 6).
Freeform
If you choose “Freeform” you are not prompted to provide any values in advance. This gives you freedom to create any type of firewall rule without assistance.
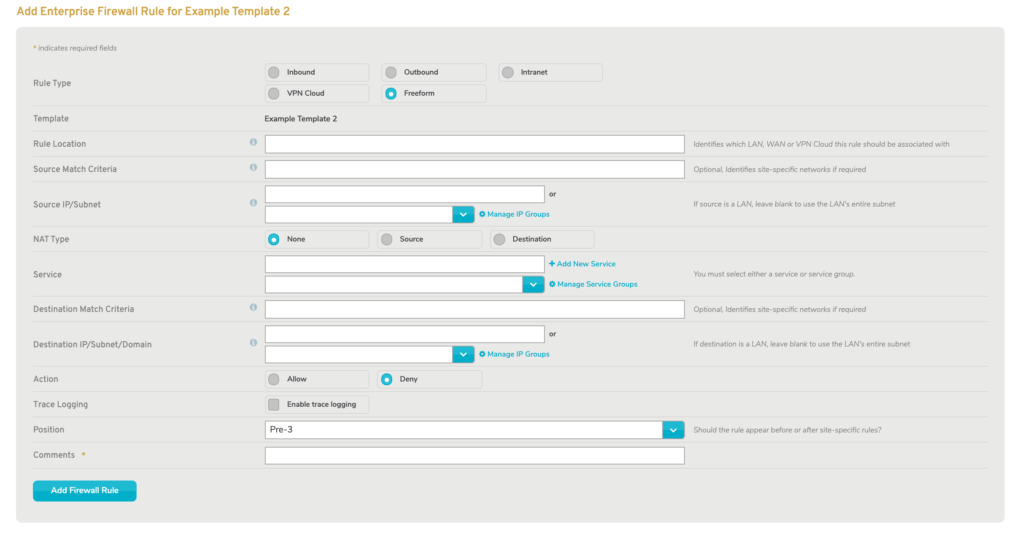
Figure 7. Add Enterprise Firewall Rule Form for Freeform Rules
The full form is displayed with minimal fields populated (Fig. 7).
Template
The selected Enterprise Template is displayed here.
Rule Location
Enter the LAN, WAN or VPN Cloud to which the firewall rule will apply. This must be formatted using the Enterprise Template Match Criteria documented above.
Source Match Criteria (Optional)
Enter site-specific source networks, if required. This must be formatted using the Enterprise Template Match Criteria documented above.
Source IP/Subnet (Optional)
Enter source network wildcard subnet masks, if required. See the Enterprise Template Subnet Matching documentation above for details.
If the source is a LAN, leave this blank to use the LAN’s entire subnet.
Service
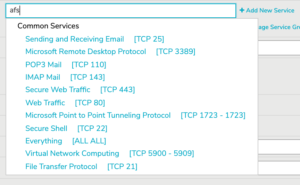
Figure 8. Example Service Type Selector
Use the service type selector (Fig. 8) to specify the service type of the traffic to which the new rule will apply. The service type selector will display a Search Results list as you type. Below the Search Results list, you will see lists of Recent Services (if any have been selected recently) and Common Services. If the desired service type is visible in one of these lists, click the service type to select it. Otherwise, click the “Add new service” link below the selector to open the Add Service page (Fig. 9) in a new window.
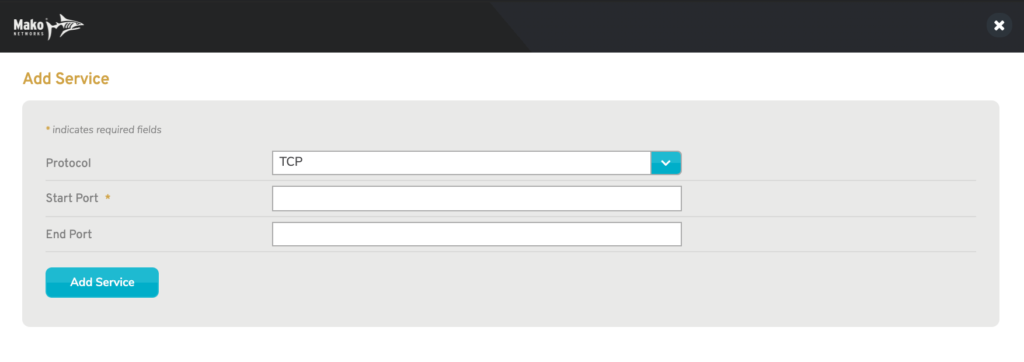
Figure 9. Example Add Service Page
Use the Add Service form (Fig. 9) to add a new service type to the selector by choosing a Protocol (either “TCP” or “UDP”), entering Start Port and End Port values, and then clicking the “Add Service” button.
NAT Type
If your source or destination uses Network Address Translation (NAT), click either the “Source” tab or the “Destination” tab and enter the NAT IP address in the appropriate field.
If you choose “Source” the following field becomes available:
Source NAT IP/Subnet
Enter the NAT IP address.
If you choose “Destination” the following fields become available:
Target IP/Subnet
Enter the NAT IP address.
Internal Service
Use the service type selector to specify the internal service type of the traffic to which the firewall rule will apply. The service type selector will filter its results as you type.
See the Service field above for a full description of how to use the service type selector.
Destination Match Criteria (Optional)
Enter site-specific destination networks, if required. This must be formatted using the Enterprise Template Match Criteria documented above.
Destination IP/Subnet/Domain (Optional)
Enter destination network wildcard subnet masks, if required. See the Enterprise Template Subnet Matching documentation above for details.
If the destination is a LAN, leave this blank to use the LAN’s entire subnet.
Action
Choose whether to allow or deny the traffic to which the new rule will apply. This is set to “Deny” by default. Click the “Allow” radio button to allow the traffic instead.
Trace Logging
Choose whether or not to enable trace logging. Trace logging allows you to trace individual IP connections allowed and denied through the firewall. The trace information can be viewed on the Reports >> Syslogs page by selecting the “Firewall Logs” type. Trace logging can negatively impact performance and should only be enabled while troubleshooting firewall-related connection problems. Trace logging is disabled automatically after four days.
Position
Position determines the order in which firewall rules are implemented.
Choose a position for the new firewall rule either before or after a Mako’s user-defined rules. There are five positions before (“Pre 1” – “Pre 5”) and five positions after (“Post 1” – “Post 5”). The default value is “Pre 3.”
Comments
Enter comments that will help to identify this firewall rule. These comments are required.
Add Button
Click the “Add Firewall Rule” button to create a new firewall rule with these settings.
View Firewall Rules
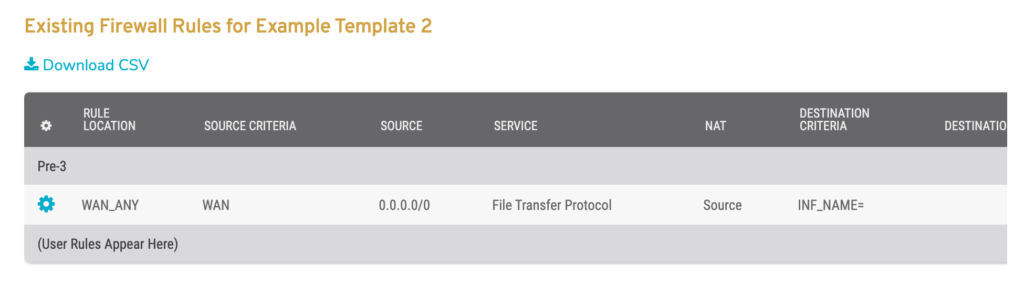
Figure 10. Example Existing Rules List
Use the Existing Rules list (Fig. 10) to view and manage existing firewall rules for the selected Enterprise Template. Firewall rules in this list are grouped by Position values.
Columns
- [Edit] – edit button
- Rule Location – network to which the firewall rule applies
- Source [Match] Criteria – source conditions
- Source [IP/Subnet] – source IP and subnet mask; supports wildcard subnet masks
- Service – service type to which the firewall rule applies
- NAT [Type] – NAT type, if applicable
- NAT [Internal] Service – NAT service type, if applicable
- Destination [Match] Criteria – destination conditions
- Destination [IP/Subnet/Domain] – destination domain or IP and subnet mask; supports wildcard subnet masks
- Attributes – icons indicating whether the rule is allowing or denying traffic and whether or not tracing is enabled
- Comments – identifier for the firewall rule
- [Delete] – delete button
Actions
Edit Firewall Rule
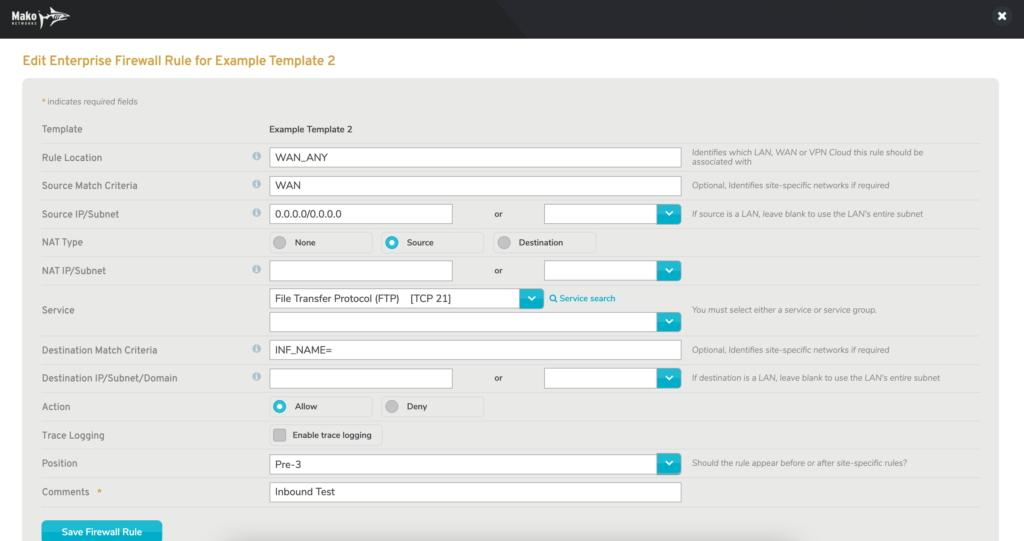
Figure 11. Example Edit Enterprise Firewall Rule Form
To edit a firewall rule, click its gear icon button. This will open the Edit Enterprise Firewall Rule form (Fig. 11) in a new window. Make any desired changes, then click the “Save Firewall Rule” button.
Delete Firewall Rule
To delete a firewall rule, click its minus icon button. This will open a confirmation panel asking you to confirm the deletion. If you are certain you want to delete the firewall rule, click the “OK” button.
Import Tab
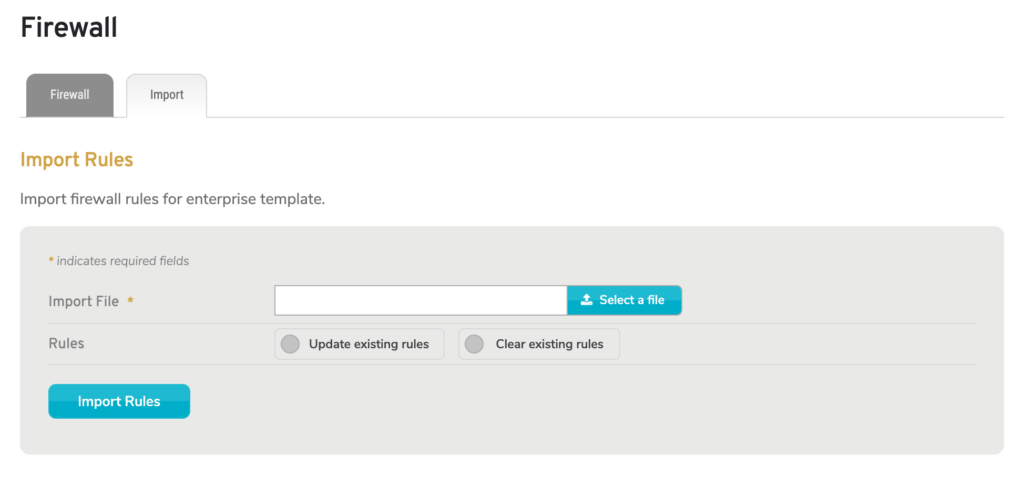
Figure 12. Example Import Tab
To import firewall rules for the selected Enterprise Template, click the Import tab.
Rules Import Form
Use the Rules Import form (Fig. 12) to initiate the firewall rules import process.
Import File
Choose the file on your device that contains the firewall rules to import.
Rules [IMPORT OPTIONS]
Specify whether or not the import process should clear existing rules before importing the new file. If existing rules are not cleared, those that appear in the new file will be updated, while those that do not appear in the new file will remain as-is.
Import Button
Click the “Import Rules” button to initiate the import process.