Overview
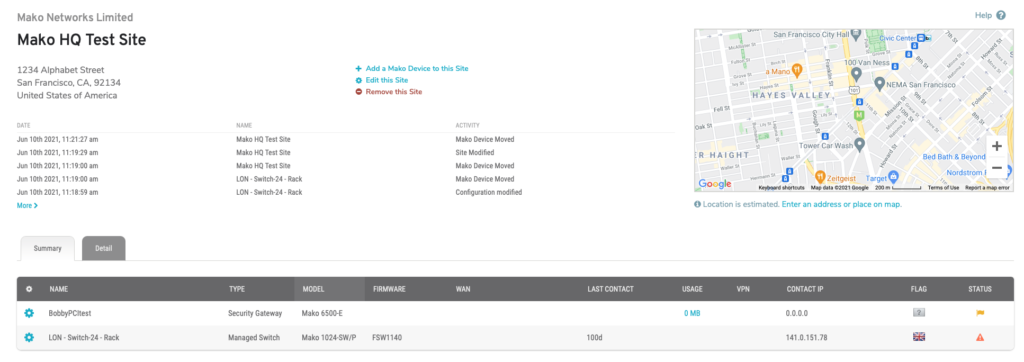
Figure 1. Example Site Home Page
The Site Home page allows you to view and manage the selected site and its related Mako devices. The primary information from the site profile displays at the top of the page along with action links that allow you to manage the site profile and an event log for the site. Below that are several tabs with additional information and features.
The Summary, Detail, and Network Map tabs offer different ways to view and manage Mako devices related to the site. The PCI DSS tab displays a summary of PCI DSS compliance activity for the site. The Periscope tab provides remote access to local services at the site. The ATG tab displays a summary of ATG monitoring information for the site.
Site Information
The following items appear at the top of the page for all tabs.
Company Name
The name of the site’s parent company.
Site Name (Site ID)
The name and optional ID of the site.
Site Address
The mailing address of the site.
Event Log
The most recent five log events for the site and its related Mako devices, and a link to view older events.
Map
The site address visualized on a map, and a link to fine-tune the site’s position.
If configured to display for this site, an ATG tank summary with a refresh link will replace the map.
Actions
The following actions are available:
- Add a New Mako Device to this Site – click here to go to the Add New Mako Device page with the Site dropdown pre-populated with this site.
- Edit this Site – click here to open the Edit Site form. See details below.
- Move this Site – click here to open the Move Site form. See the Move Site page for details.
- Remove this Site – click here to delete the site. You will be asked to confirm this action.
Summary Tab

Figure 2. Example Summary Tab
The Summary tab lists all the Mako devices for the selected site in a table.
Columns
- [Select]
- Mako Device Name
- Device Type
- Mako Model
- Firmware
- WAN
- Last Contact
- Usage
- VPN
- Contact IP
- Flag
- Status
Actions
- [Select] – click the gear icon to select the Mako device for management
- Usage – click to open a new window with details for this Mako device
- Status – click to open a new window with details for this Mako device
Detail Tab
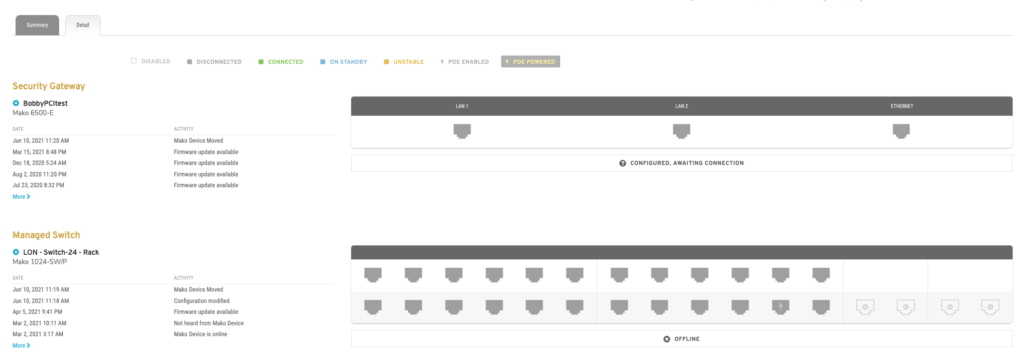
Figure 3. Example Detail Tab
The Detail tab lists all the Mako devices for the selected site grouped by device type: Security Gateway, Managed Switch, Access Point, or VPN Concentrator. Each Mako device is listed with an event log and port summary.
Details
- [Select]
- Mako Device Name
- Mako Model
- Event Log Table
- Port Summary Image
Actions
- [Select] – click the gear icon to select the Mako device for management
- Event Log Table – click “More” to view older events for this Mako device
Network Map Tab
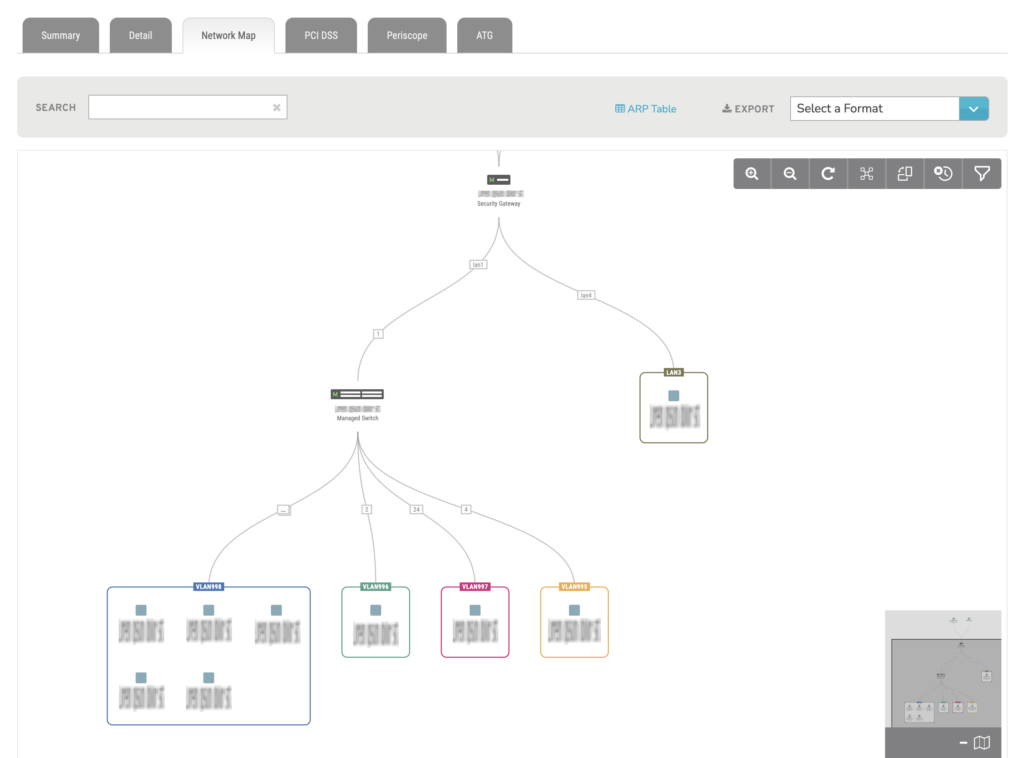
Figure 4. Example Network Map Tab
The Network Map tab displays Mako devices, connected devices, and subnets for the selected site in a diagram that illustrates the portion of the enterprise network available to the site.
Visit the Network Flow Diagram page to view a diagram that illustrates which paths network traffic can or cannot take based on current settings and permissions.
- Click and drag in the background to view a different portion of the diagram.
- Click certain nodes and connections to view more details.
- Click and drag certain nodes and connections to adjust their positions.
Map Form
Search
Enter keywords to highlight matching results in the diagram.
ARP Table
Click the “ARP Table” link to show or hide the ARP table.
ARP Table View
Choose “All Entries” or “Directly Connected Port Entries Only” to filter the ARP table.
ARP Table Columns
- MAC ADDRESS
- IP ADDRESS
- CLIENT NAME
- DETAILS
- LAST SEEN
Export
Choose PNG or high-quality PNG format to export the diagram as an image.
Choose TXT format to export the diagram as data.
Map Toolbar
Zoom In / Zoom Out
Use the Zoom In and Zoom Out buttons in the toolbar to change how much of the diagram is visible.
Reload
Click the Reload button in the toolbar to refresh the diagram using the latest data and reset nodes and connections to their default positions.
Graph View / Tree View
Click the View button in the toolbar to toggle between Graph View and Tree View for the diagram.
Orientation
Click the Orientation button in the toolbar to toggle between landscape and portrait orientations for the diagram.
Last Seen Filter
Click the Last Seen Filter button in the toolbar to enable or disable the Last Seen Filter, which hides devices that have not been seen recently from the diagram to make it more readable.
Smart Filter
Click the Smart Filter button in the toolbar to enable or disable the Smart Filter, which reduces clutter in the diagram to make it more readable.
Mini Map
The Mini Map in the lower right corner of the diagram illustrates the position of the currently visible portion of the diagram within the full diagram.
- Click the Mini Map button to hide or show the Mini Map.
- Click and drag the frame in the Mini Map to view a different portion of the diagram.
PCI DSS Tab
If Merchant PCI is enabled, the PCI DSS tab displays a summary of PCI DSS compliance activity for the site.
Periscope Tab
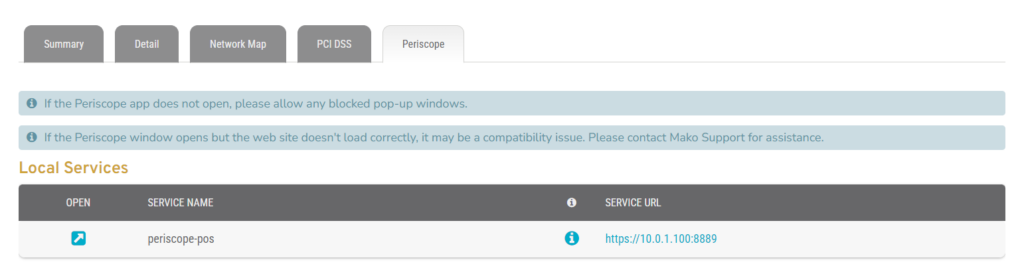
Figure X. Example Periscope Tab
If Periscope is enabled, the Periscope tab lists all services accessible via Periscope for the selected site. Click a service to open a secure Periscope connection in a new window.
Visit the Company Periscope page to manage Periscope Services for the selected company and configure multiple sites at once.
Visit the Site Periscope page to manage Periscope Services for the selected site.
Columns
- [Open]
- Service Name
- [Info]
- Service URL
Actions
- [Open] – click to open a Periscope connection to the service in a new window
- [Info] – hover to see more details
- Service URL – click to open a Periscope connection to the service in a new window
If the Periscope window does not open, you may need to allow popups in your browser.
If the Periscope window opens but the service does not load correctly, it may be a compatibility issue. Please contact Mako Support for assistance.
Periscope Window
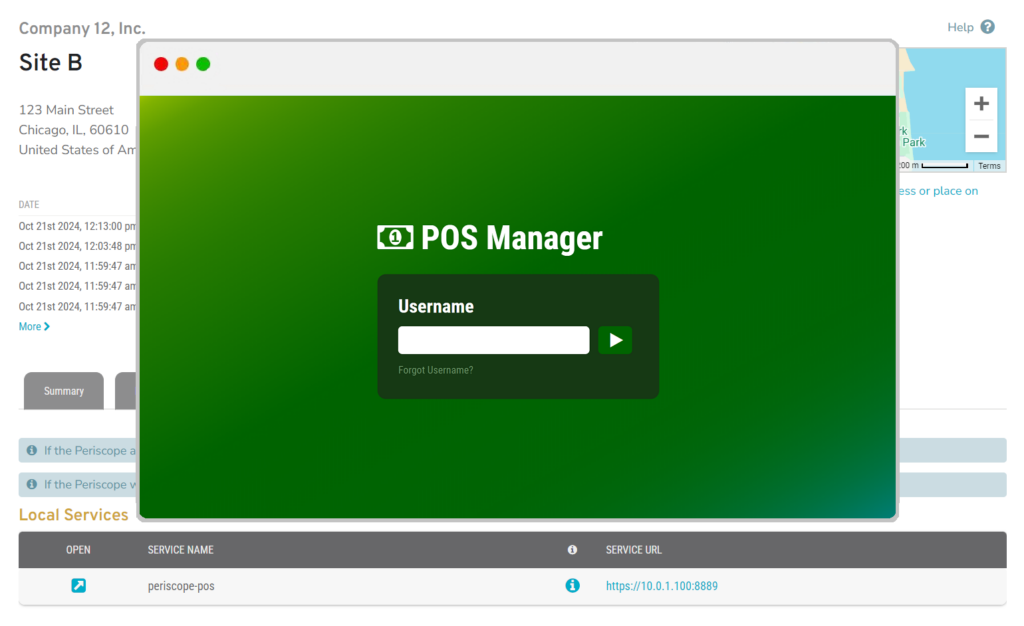
Figure X. Example Periscope Window
Use the Periscope window to interact with a service at the selected site via a secure connection.
Periscope connections terminate after 15 minutes of inactivity.
ATG Tab
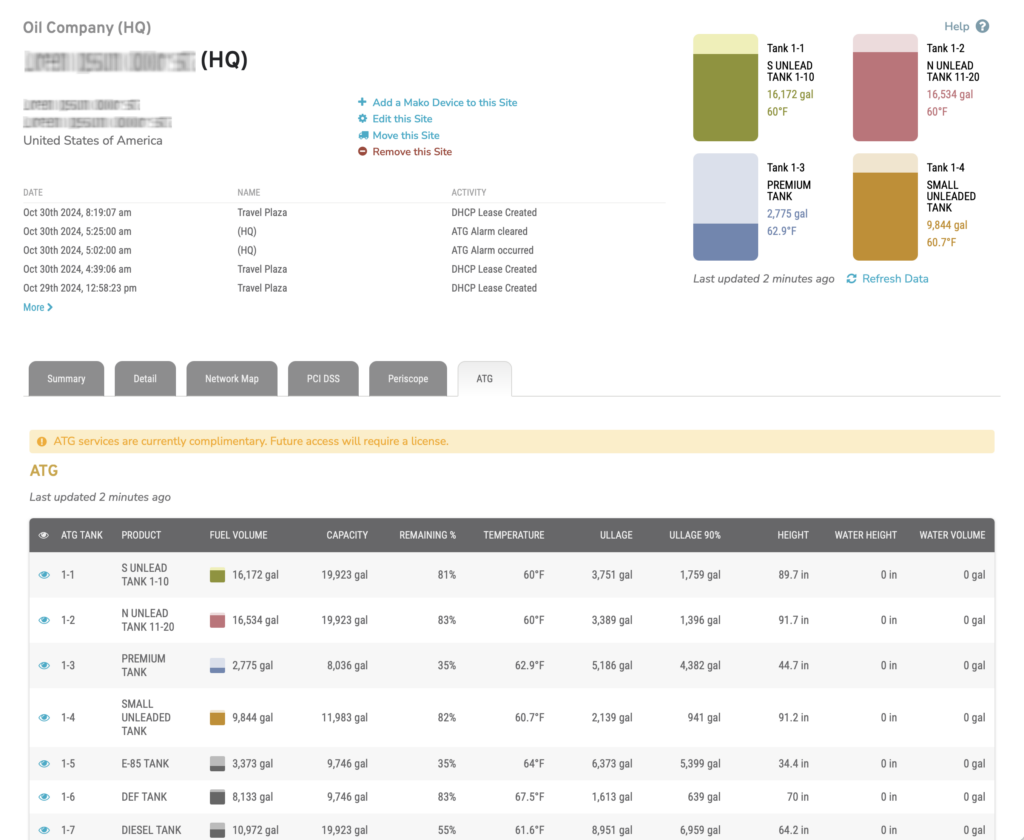
Figure X. Example ATG Tab
If SmartATG monitoring is enabled, the ATG tab displays a summary of ATG monitoring information for the selected site. Click the eye icon button for a tank to view its details.
If configured to display for this site, an ATG tank summary with a refresh link will replace the map.
Visit the Company SmartATG page to manage ATG monitoring settings for the selected company and configure multiple sites at once.
Visit the Site SmartATG page to manage ATG monitoring settings for the selected site.
Edit Site Form
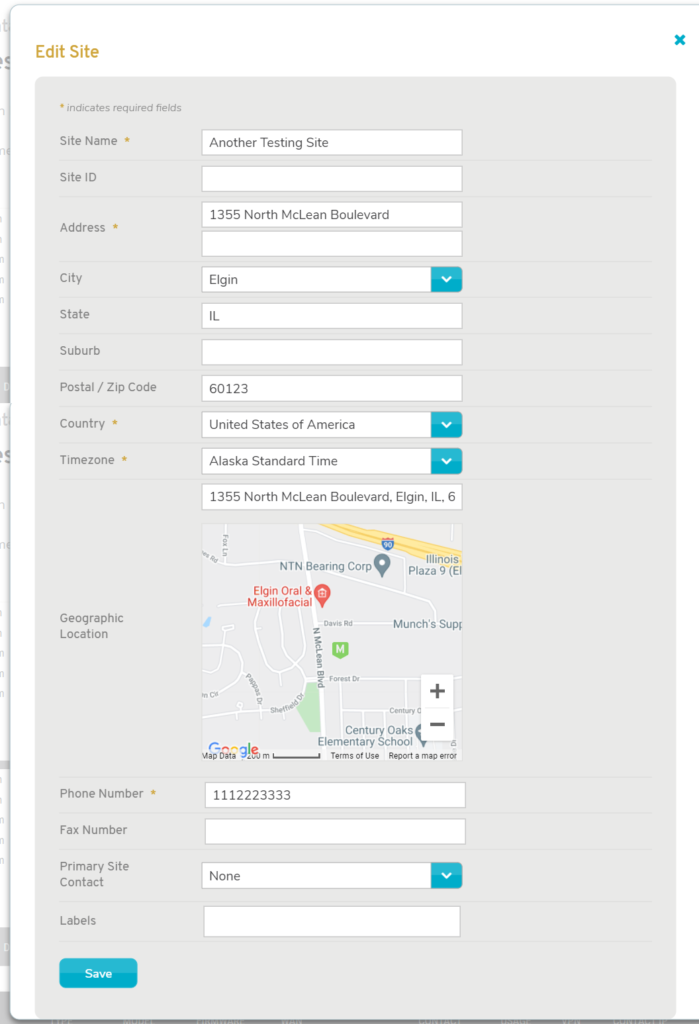
Figure X. Example Edit Site Form
Use the Edit Site form to edit the selected site.
Site Name
Enter an informative, memorable, and unique name for the new site.
Site ID (Optional)
If your company uses unique Site IDs for each site, enter a unique value here for the new site. If you choose to enter it later, you can do so using the Edit Site form on the Sites >> Manage Site >> Home page. Once a value has been entered for Site ID, it cannot be changed.
Address (Line 1 and Optional Line 2)
Enter a street address in the first field and related information, such as an apartment number, in the optional second field.
City (Optional)
Enter the city or metro area of the site address. This is optional but recommended.
State (Optional)
Enter the state or region of the site address. This is optional but recommended.
Suburb (Optional)
If desired, enter the suburb of the site address.
Postal/ZIP Code (Optional)
Enter the postal code (ZIP Code in the US) of the site address. This is optional but recommended.
Country
Choose the country of the site address.
Timezone
Choose the timezone of the site address.
Geographic Location
Enter the site address to set the exact geographic location on the map.
Phone Number
Enter the phone number of the site address.
Fax Number (Optional)
If desired, enter the fax number of the site address.
Primary Site Contact
Choose the Mako CMS user to be the primary contact for the site.
Labels
The Labels field allows you to manage label values assigned to the site. A label can be added by typing a label value in the field and then pressing the space bar on your keyboard. A label can be removed by clicking the minus icon next to the label.
Labels provide an alternate way to search for sites. See the Site Search documentation for more details.
Save Button
Click the “Save” button to save any changes made here.